Johbisai or Joubisai: Building up a bento making 'stash'
Anyone who does any kind of art or craft work is familiar with the concept of a stash. A knitter for example has a stash of different kinds of yarn. This really helps to get the creative juices flowing. In bento making terms, the equivalent of a stash is joubisai (or johbisai) (常備菜). Literally this means 'always available food'. They are stored foods that can be kept for a while, which can be pulled out and used on short notice, and enrich and streamline the bento making process. It's a combination of what we know of as kitchen staples plus pre-prepared little tidbits, specifically meant for making bento (or any other meal, but here we'll talk about bento-specific johbisai). Japanese people who regularly make bento almost always have their own stash of johbisai secreted in their refrigerators, fridges and cupboards.
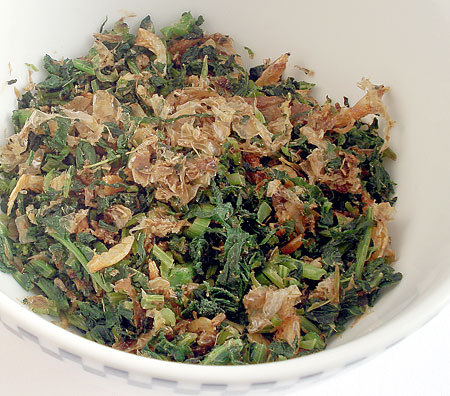
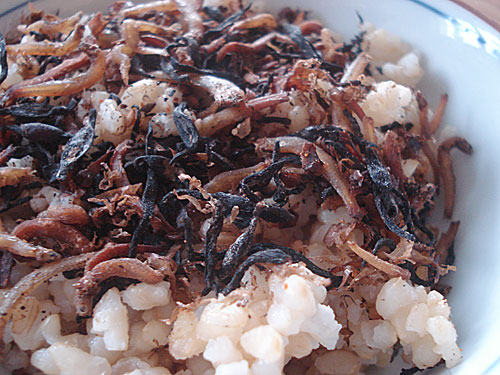
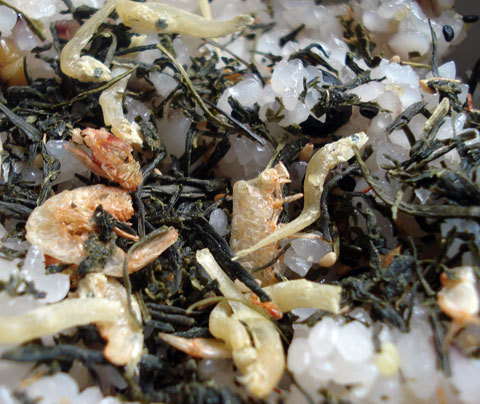
For example, I usually have several kinds of Japanese pickles and tsukudani (various foods cooked for a long time in a soy sauce based sauce) in the fridge, things like store bought furikake (though I usually prefer to make my own) and nori seaweed n the pantry, and various frozen tidbits in the freezer - mini meatballs, a mushroom mix, braised pork cubes, little stacks of pre-prepared vegetables.
Building up a bento stash is not too difficult, and you don't have to have dedicated cooking sessions to make them. Whenever I make meatloaf or meatballs for dinner, I always make something with the ground meat mixture that be used in future bentos - mini meatballs, tiny hamburgers, even mini meatloafs. I will usually pre-cook them, let them cool while I'm making the rest of dinner, freeze them on a metal tray then dump them all into a plastic freezer bag. (I'm a big fan of plastic bags because they take up minimal space.) If I blanch spinach, I'll take out some, make small bundles of them and freeze in a similar way.
Whenever you are cooking, think of ways in which you can set aside a little or make a bit extra that can be used for bento making. Just having your own stash can really ease your mind and enrich your bento boxes.
See the list at the end of this article for bento-friendly johbisai recipes.
How to keep johbisai
Refrigerated johbisai items should be well wrapped to keep odors out (or in). Unless they are preserved foods like pickles, you should never keep them for longer than a week at maximum; meat items should be used up within 3-4 days or be frozen.
When freezing, think of the nature of whatever it is you want to freeze and store accordingly. For example, anything that should be moist should be wrapped up in plastic while it still a little warm, to retain that moisture. Rice is the best example of this type of food, as are something like steamed dumplings or anything made with flour. Other items should be cooled completely to room temperature before freezing, in order to prevent a buildup of moisture and ice crystals on the surface, which may cause it to defrost in a soggy state..
Putting items in small portion-sized quantities on a metal tray helps them to freeze very fast, which is what you want to do. It also helps to keep each portion separate once you pack them into well-sealed plastic bags or containers.
Try to use up any frozen cooked food within a month for optimum quality.
Build your stash up slowly
Don't get too hung up on growing your bento stash though. As long as you have at least a couple of things stored away that you can pull out when needed, that's fine. I'd really like people to get away from the idea that you need to get together a lot of 'stuff' before embarking on their bento making adventures! Just take it easy and jump in!
A few of my favorite storebought stock items
In the freezer:
- Frozen peas
- Frozen edamame, both in the shell and shelled
- Frozen mixed vegetables of all kinds, such as peas and carrots
- Frozen uncooked shrimp, peeled or whole
- Frozen berries
- Seeds like sesame and sunflower. I find they can turn rancid fast at room temperature, so if I buy a big bag of sesame seeds, I put it in a plastic container with a lid and freeze it. I can just scoop out what I need.
In the refrigerator:
- Japanese or Western pickles and cornichons (once opened)
- Miso, kochujang, and other miso-like pastes (once opened)
- Umeboshi (pickled plums) (once opened)
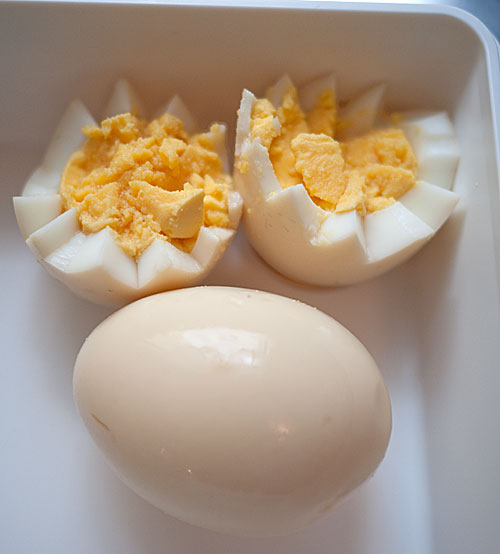
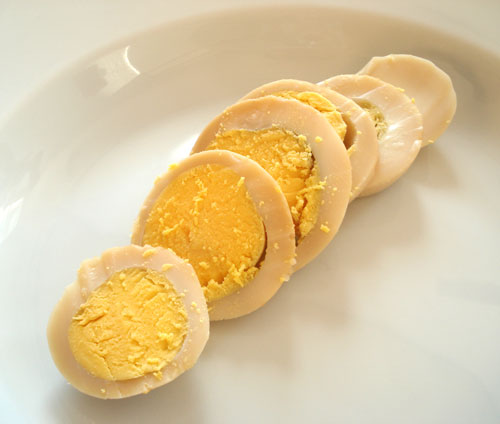
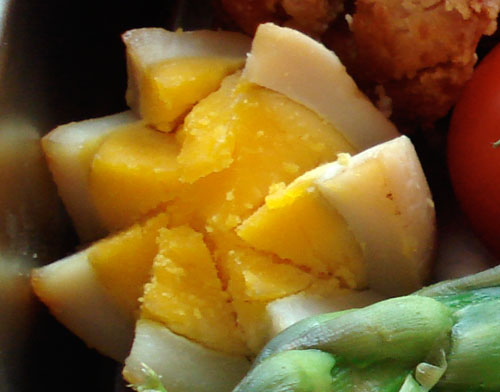
- Eggs. Always have some eggs.
- Fresh ginger
In the pantry:
- Vegetables that can be kept out of refrigeration: onions, garlic, potatoes
- Various canned goods, especially tuna, sardines, salmon, anchovies, all kinds of beans, certain vegetables (corn, tomatoes)
- I stock various dried Japanese foods like seaweed (nori, wakame, konbu, hijiki, tororo konbu), dried tofu (kouya dofu) and dried daikon radish (kiriboshi daikon), but these are strictly optional. Very convenient though!
- Furikake (optional)
- Soup stock cubes or granules, dashi stock granules
- Soy sauce
- Mirin and sake (optional unless you make a lot of Japanese food)
- Vinegars - I have rice, red wine and balsamic right now
- Salt, pepper
- Various spices such as dried red chili pepper flakes and powder, nutmeg, cinnamon, paprika (hot and sweet), turmeric, curry powder, garam masala mix, cumin, coriander, cardamon, sansho pepper, and on and on...
- Dried herbs: Thyme, rosemary, Herbes de Provence mixture
- Flour
- Cornstarch or potato starch
- Oils - olive, sesame, neutral flavored cooking oil such as canola or sunflower or peanut
- Agar-agar powder
- Sugar or sugar substitutes and other sweeteners like honey, maple syrup, agave syrup
- Ketchup
- Tomato paste
- Worcestershire sauce
- "Bulldog" sauce (Japanese steak or tonkatsu sauce) (optional)
- Hoisin sauce (optional)
- Sriracha sauce or chili sauce of your choice (e.g. harisa)
- Rice (brown and white) and other grains like quinoa, millet, amaranth, barley
- Dried beans - red kidney, chickpeas, white beans, azuki beans
- Dried pasta
- Nut butters
- Raw nuts - almonds, pine nuts, cashew nuts (use up before they turn rancid)
- Dry crackers and long-keeping bread like rye crackers and those little round breads you can get at Ikea
See also
- How to freeze rice - a frozen rice stash is the handiest staple to have for bento making!
- Readers' favorite bento staples
If you enjoyed this article, please consider supporting this site by becoming my patron via Patreon.
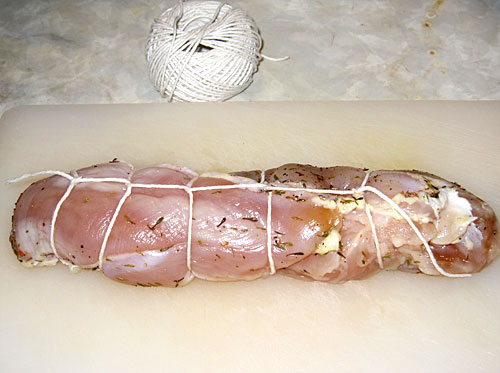
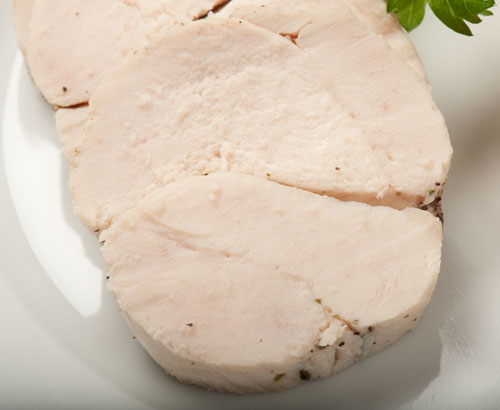
Char siu or yakibuta - Chinese style roast pork
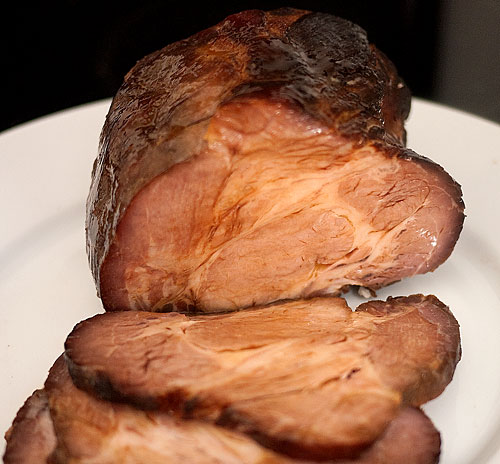
I have posted a recipe for char siu, or Chinese style roast pork, previously. But that was way back in 2004, and my standard go-to recipe has changed a bit since then. Plus, it makes a great staple for bentos, so here it is.
Char siu, called yakibuta in Japanese (in Japan it's called by both names チャーシュー or 焼豚)is used in many everyday dishes. It is very rich, so it's usually used in small quantities, not eaten as a hunk o' meat. Here are just a few ways you can use it:
- top off a bowl of ramen with one or two thin slices
- cut into cubes and add to fried rice
- roughly chopped and use as a filling for steamed buns (where my original char siu recipe appeared)
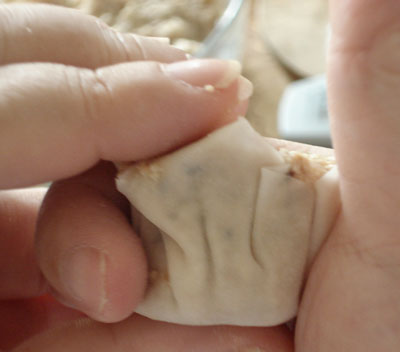
- minced and use as a shumai filling
- as a sandwich meat
- cut into strips for salads or stir fries
Or, you can just cut a few slices or strips to tuck into the corner of your bento as-is.
It does take some time to prepare and cook, but your actual kitchen time is minimal. You can store it in the refrigerator for a few days, or cut it up and freeze it. The marinade can be used as a sauce too. It's a very frugal dish, and one of my favorite ways to cook pork.
Note that this recipe has just a few more ingredients than my original recipe, and a more complex flavor. If you cannot find sake or shaoxing wine, or can't use alcohol for some reason, please try the alcohol-free recipe that I posted previously (scroll down for the roast pork recipe). If you don't have an oven, try my nibuta (stewed pork) recipe.
The cut of pork you use is very important. I usually use either the shoulder or the neck, both of which have some marbling but not too much. They're also usually fairly reasonably priced. The butt is fine to use too. Loin is lower in fat and not that suitable for this. Filet is very low in fat, not to mention expensive, so the char siu will be rather dry. Belly or ribs are too fatty.
Commercial char siu is sometimes dyed a bright red color, which I have omitted here.
Recipe: Char siu or yakibuta - Chinese style roast pork
- A bit more than 2 lbs (1kg) pork shoulder or neck
For the marinade:
- 1 cup (360ml) soy sauce
- 3 Tbs. oyster sauce
- 5 Tbs. sugar
- 1/2 cup shaoxing wine (紹興酒)or sake or dry sherry
- an inch-long (2cm) piece of fresh ginger, peeled and sliced
- 1 small onion, peeled and cut into quarters
- 2 garlic cloves, peeled and crushed with a knife
- 1 cinnamon stick
- 1 small piece of star anise
- 1 clove
Poke the lump of pork all over with the point of your knife. This allows the marinade to penetrate the meat better.
If you want your pork to be a neat, even bundle, wind some kitchen string around it tightly. I usually skip this step.
Combine all of the marinade ingredients in a bowl.
Put the pork in a sturdy plastic zip bag, then put another bag over it (the second bag catches any leaks - and believe me, that first bag always leaks.) Pour the marinade into the inner bag. Express as much air as you can out of the bag, and close it. Close the outer bag also.
Place the bagged pork on a plate, and put it in the refrigerator. Marinate it for at east 3 hours or overnight. Turn it around occasionally to distribute the marinade evenly.
When you are ready to cook it, preheat the oven to 450°F (220°C). Take the pork out of the bag and put it in an oven baking dish. Add the marinade. Roast the pork at the high temperature for 15 minutes, then lower the temperature to 250°F (120°C). Turn the pork over.
Roast the pork for 1 1/2 to 2 additional hours, turning it every 30 minutes, or until an oven thermometer registers an internal temperature of 160°F (70°C). Take the baking dish out of the oven and let the meat cool in the marinade, turning occasionally to moisten the meat surface. Cool down before slicing.
Char siu will keep in the refrigerator for 4-5 days, and in the freezer for up to 3 months.
To store in the freezer: I find it's easiest to use if I cut it up before freezing. I cut some of it into slices, some into cubes, and some into strips, divide it all up into single-use portions, and freeze. Sometimes I add a drizzle of the marinade to the meat before packing it up. This amount of char siu lasts me for a good month, used in various dishes.
The marinade itself can be frozen too. Skim off the solidified fat from the surface of the cooled marinade, and strain it through a sieve. Put it in a plastic zip bag and lay flat in the freezer. Once frozen, you can just scoop out a little bit at a time with a spoon. Use a little bit in a stir-fry, fried rice, and so on.
Variations
You can make it sweeter by sprinkling the surface with sugar every time you turn the meat.
As an alternative to using the cinnamon stick, star anise and clove, use 2 tablespoons of Chinese five spice powder. You can also omit the spices entirely, for a simpler flavor.
Equipment note: Instant-read meat thermometers
If you are a meat-roasting newbie, I really recommend getting an oven thermometer - they really aren't expensive, and will take away any anxieties you may have over overcooking an expensive piece of meat.
If you enjoyed this article, please consider supporting this site by becoming my patron via Patreon.
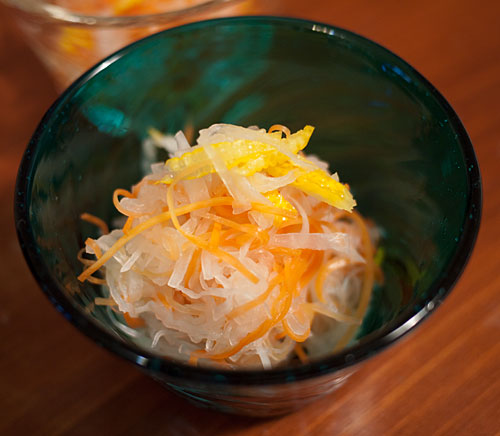
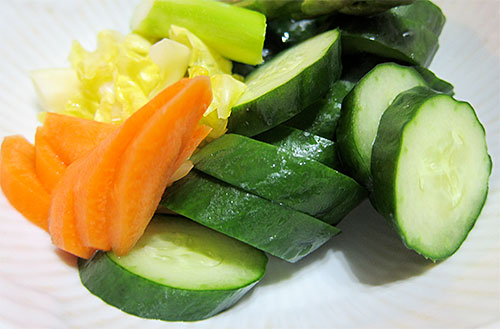
All-season shredded vegetable pickle-salad, plus migrating birds!
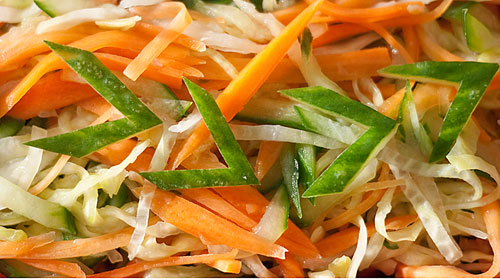
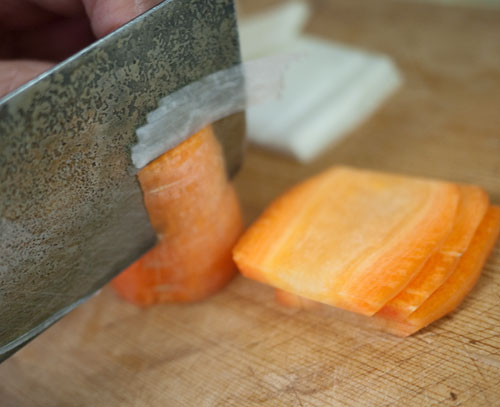
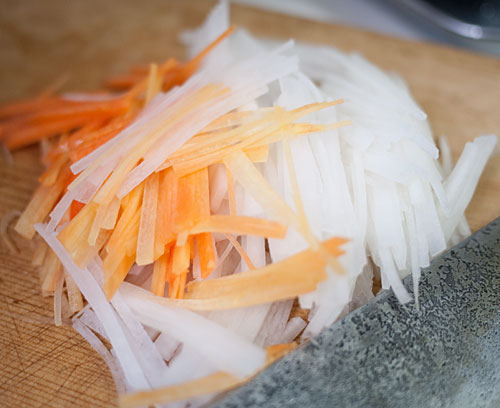
Let's face it, February is not a very good month for vegetable lovers in much of the northern hemisphere. We're done with the bounty of fall, and we're looking forward to spring produce, but for the moment what we see in the stores are flown in from faraway parts or blandly grown in greenhouses. Three vegetables I rely on heavily around this time of year are the cabbage, carrot and cucumber. The 3-c's are somewhat boring perhaps, but are predicably crunchy when raw, and in the case of the first two, sweet and delicious when cooked. (Cooked cucumber is quite interesting, but that's for another day.)
This is another one of those instant pickles that I have tons of recipes for on this site and on Just Hungry. They are great refrigerator staples that you can keep around for at least a week or two, if not longer. It is based on several flavors, most notably my mom's namasu (carrot and daikon radish salad/relish thing... there's not much distinction between Japanese/Asian pickles, relishes and salads sometimes) as well as Vietnamese do chua, which is a must-have in bahn mi sandwiches. It works with rice based bentos or in sandwiches (though there is a trick to that, which I will get to in a later post) as a refreshing/slightly sweet hashiyasume or change of pace side. I did stay away from using daikon radish; while daikon is ubiquitous in Japan and throughout Asia, it's not as take-for-grantedly common in much of North America and Europe.
I don't like to make a huge amount of this, since I would typically use it 4-5 times over the course of a couple of weeks, which is how long I'd keep this for in the refrigerator.
Recipe: All-season shredded vegetable pickle-salad
Makes about 3 cups (4 cups of vegetables wilt down in volume when done)
- 1 teaspoon salt
- 2 cups finely shredded cabbage
- 1 cup finely shredded carrot
- 1 cup finely shredded cucumber
- 1/2 cup rice vinegar
- 4 tablespoons sugar
- 2-3 dried red chili peppers
- 1 5 cm / 2 in square piece of konbu seaweed, or 1 teaspoon konbu dashi stock granules (or regular dashi stock granules if you don't mind it being non-vegetarian)
Put the vegetables in a bowl and sprinkle on the salt. Massage the vegetables until the vegetables have wilted a bit.
Combine all the ingredients in a non-reactive (not metal) container with a tight fitting lid. Put the lid on and give it a good shake. Leave to marinate overnight before eating. Keeps in the refrigerator for a couple of weeks at least.
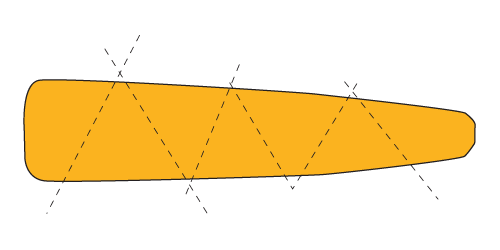
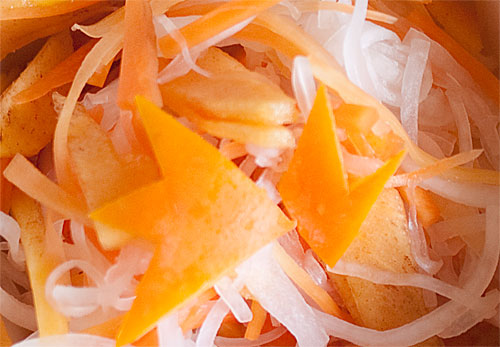
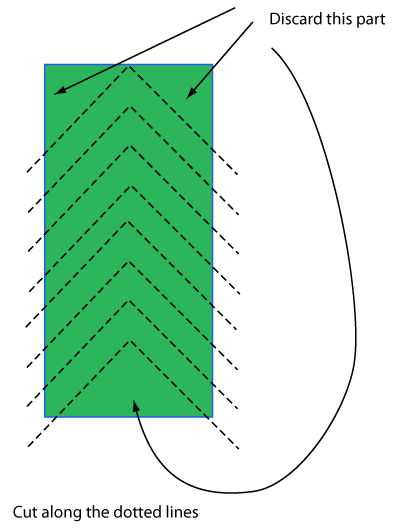
Decorative cut bonus: Migrating birds or arrowheads
The decoration on top of the picture above is made from fresh cucumber skin, and takes just a couple of minutes to do. I meant for it to look a bit like migrating birds, inspired by the tons of birds flying around in the sky near our house until a couple of months ago. They were a bit scary, but really impressive - I've seen migrating birds before though, but not in such an open sky. Here's a photo taken by The Guy one evening.

This is such a simple cut that i"m sure it's been thought of before. If I find a known name for it I'll ost it here. You could use the pieces as arrows, or to show a trail or something like that too. Just take off a thin strip with a knife or vegetable peeler, trim it into a rectangle shape, and cut like the diagram here.
If you enjoyed this article, please consider supporting this site by becoming my patron via Patreon.
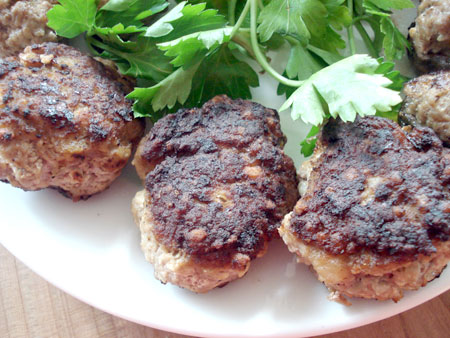
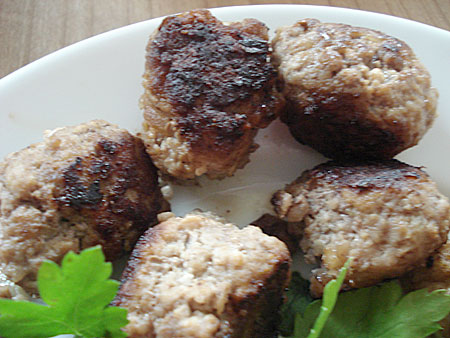
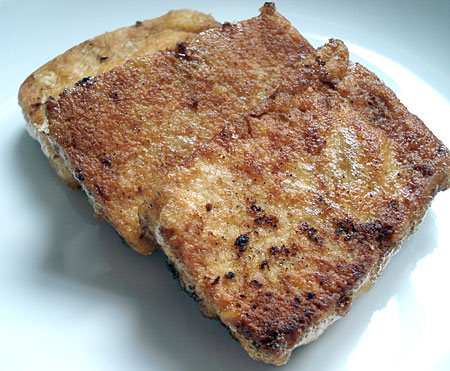
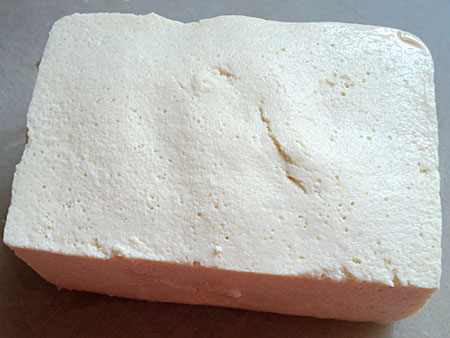
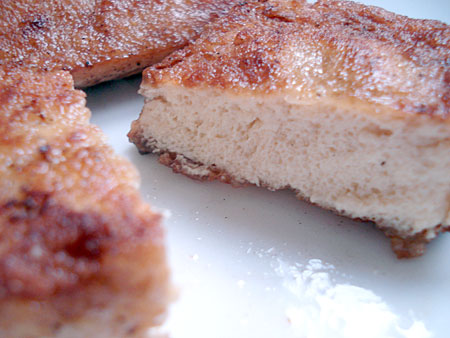
Basic meat and tofu mixture for mini-burgers, meatballs and more
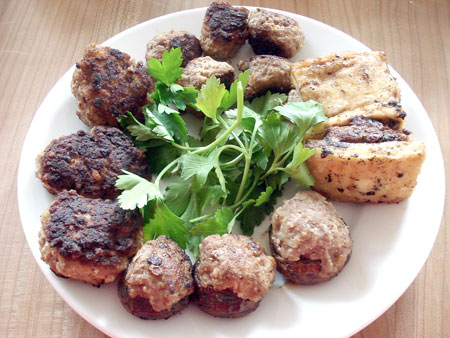
I spent about an hour on Sunday making and cooking up a big batch of a basic burger mixture. The mix is very versatile, so I made four different things from it. Now I have enough mini-burgers, meatballs and more in my freezer for at least 20 or more bento portions. It was an hour well spent! I love just knowing that my freezer has a nice stock of ready-to-go bento items - it takes the pressure off considerably on busy mornings.
Recipe: Basic burger-meatball mixture
You can use more ground beef or ground veal or chicken instead of the tofu. The tofu makes it a bit lighter.
- 450g / 1 lb ground beef
- 225g / about 8 oz. ground pork
- 225g / about 8 oz. (about half a block) soft or silken tofu
- 1 cup fresh soft breadcrumbs (made by whizzing up 2 slices of bread in a food processor)
- 1 large onion
- A little milk or soymilk
- 1 egg
- 1 1/2 tsp. salt
- 1/2 tsp or so black pepper
- 1/2 tsp. or so nutmeg (optional)
- Oil for cooking
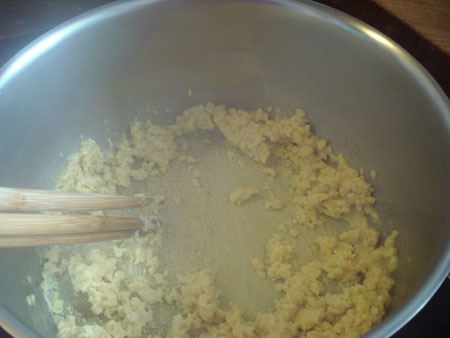
If necessary, make fresh breadcrumbs by chopping up 2 slices of bread (white or whole wheat) in a food processor. Moisten with a little milk.
Chop up the onion finely (I do this in the food processor too, after the breadcrumbs.) Saute in a little oil in a frying pan until soft.
Drain the tofu well and crumble.
Combine all the ingredients in a large bowl. Mix with your hands until a bit sticky and paste-like. The tofu should be all smooth and incorporated into the meat.
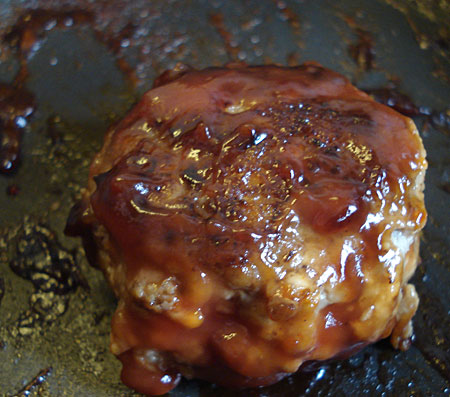
Heat up a frying pan with a little oil. Form the meat mixture into various shapes, as follows:
Mini-burgers: Take about 3 tablespoon-portions and form into little patties. Fry on one side, then turn and fry on the other with a lid on the pan for about 4 minutes until the patties are a bit puffed up.
Meatballs: Take 1 tablespoon-portions and form little balls. Roll around in the pan with a little oil until browned on all sides.
Stuffed tofu slices: Cut a slit into a small block of tofu, and stuff with about 1/2 Tbs. of the meat mixture. Dust the tofu with cornstarch and fry, turning all around, in a hot frying pan until browned on all sides.
Stuffed mushrooms: Twist off the stems of medium-size mushrooms, leaving the caps (use the stems for something else). Stuff each cap with about 1 Tbs. of the meat mixture, pressing down well. Put the stuffed mushrooms meat side down in a hot frying pan, and sprinkle the mushroom cap with a little salt. Turn over when the meat side has browned, lower the heat to low, put on a lid and let steam-cook for about 5-6 minutes.
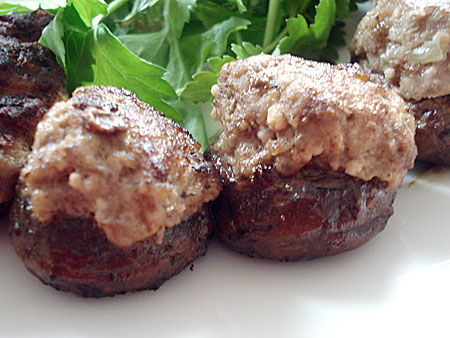
Cool everything completely, and freeze. You can just put them in plastic freezer bags and take out only what you need.
Defrosting and saucing
Defrost either in a microwave for about 3-4 minutes, depending on how big your burgers or meatballs etc. are; or in a small frying pan with the lid on to steam-cook them. You can also pop them in a toast oven from frozen, wrapped in foil - they'll take about 8-10 minutes this way.
The mini-burgers and so on will taste a bit bland when cold. To perk them up, you'll want to add a sauce to them. The easiest are plain ketchup, oyster sauce, "Bulldog" sauce, or even soy sauce. Just heat up the sauce of your choice in a small frying pan and toss the defrosted mini-burger in it.
This little mini-burger is sauced with a mixture of 1 Tbs. ketchup, 1 tsp. Worcestershire sauce, and about 2 Tbs. red wine (per 3 of this mini-burgers). Add all the sauce ingredients to a small frying pan and mix; add the burgers to the hot pan, and coat with the sauce.
Teriyaki sauce is also great, especially for the stuffed tofu slices. Sweet and sour sauce works well too. The stuffed mushroom caps may not need any sauce at all - maybe a little drizzle of soy sauce on top if that.
You can also simmer the meatballs in a little homemade or store bought tomato sauce, crumble up the mini-burgers and stir fry with vegetables...and whatever else you can come up with.
If you enjoyed this article, please consider supporting this site by becoming my patron via Patreon.
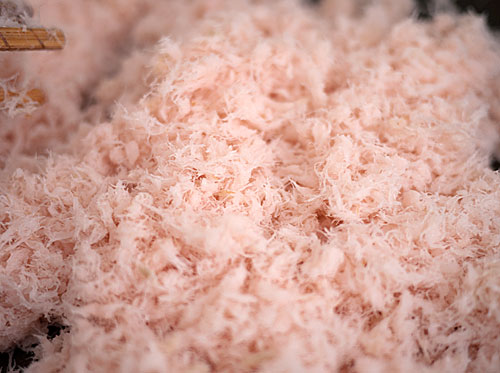
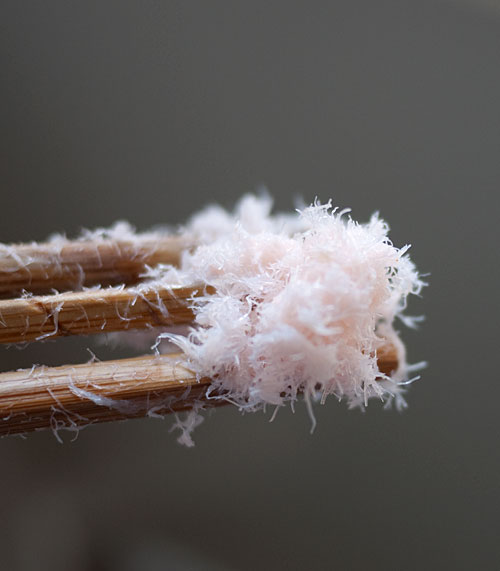
Basic meat soboro, a great bento staple
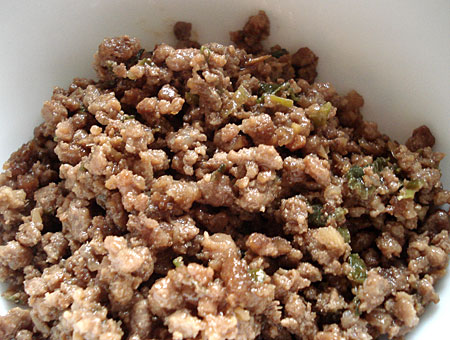
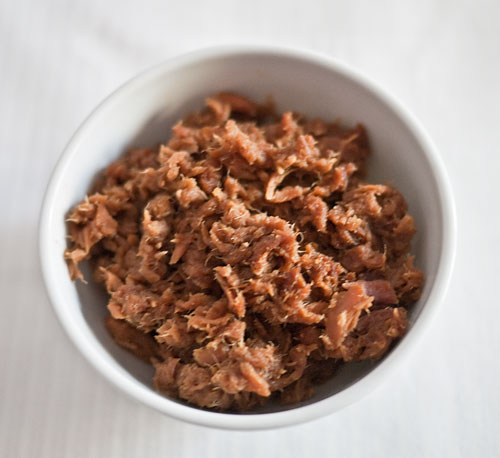
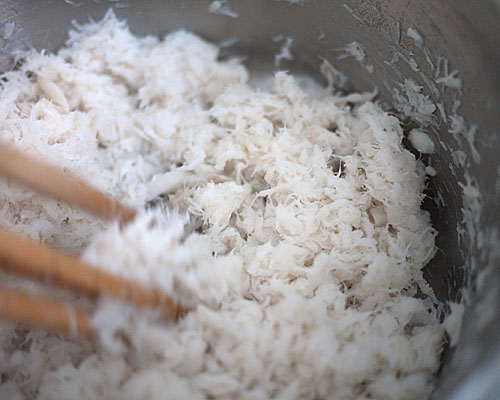
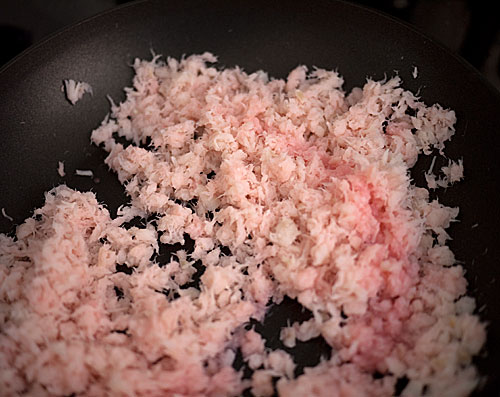
A soboro is rather like furikake, except that it's moister. It's used like furikake in many situations - sprinkled onto rice, folded into other things like eggs, and more. Soboro can be made of ground meat, flaked fish (though fish soboro is often called oboro instead), or egg (egg soboro is often called iri tamago, just to keep you confused!) Meat soboro (niku soboro) keeps for about a week in the refrigerator, and freezes beautifully, making it a great bento johbisai or staple for the omnivore.
This is a fairly universal recipe that you can use for ground meat of any kind - beef, pork, veal, turkey. I would use another formula for chicken, which has a more delicate flavor. (But ground chicken isn't available here, so I don't make chicken soboro that often since I have to grind up the meat myself.)
If you use a very lean meat, such as turkey, you may want to add a bit more oil. My preference is to use lean ground beef (in the U.S. about 90% lean).
Meat soboro
- 450g / 1lb ground beef, pork, veal, turkey or a combination of any
- 1 to 2 Tbs. sesame oil
- 1/2 cup finely chopped green onion, green and white parts both (about 2 stalks)
- 1 clove garlic, finely chopped
- 1 piece fresh ginger, finely chopped to yield about 2 Tbs. of chopped ginger
- 2 Tbs. sugar
- 2 Tbs. sake
- 3 Tbs. dark soy sauce
- 3 to 4 Tbs. oyster sauce
Equipment: a large non-stick frying pan or a wok
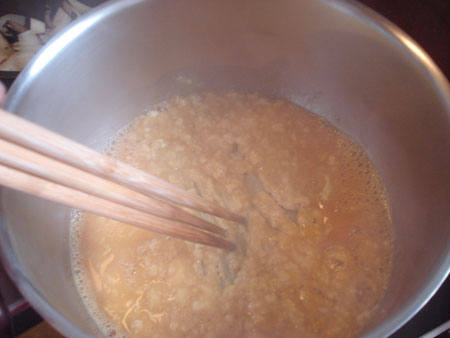
Chop up all the vegetables as fine as you can.
Heat up 1 Tbs. of sesame oil in the pan. Add the vegetables and stir fry until softened. Add the meat and brown well.
Add the sugar, and stir around until it's caramelized a bit.
Add the sake; stir around to evaporate.
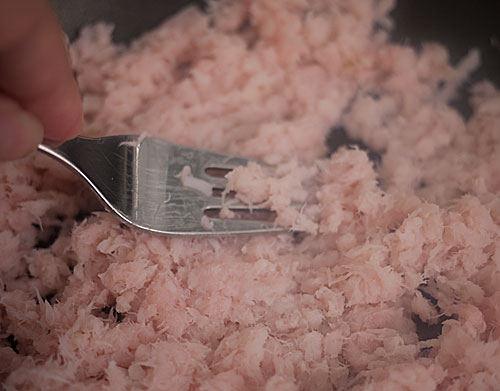
Add the soy sauce and oyster sauce. Let simmer until the liquid is almost gone, but the meat is still moist. Taste for seasoning at this point and add a little soy sauce or salt if you think it needs it. (Keep in mind that it's made to eat with something bland, like rice, so it should be quite strongly flavored.)
Note: if you keep cooking it until the meat is thoroughly dried out, it becomes a meat furikake with longer keeping qualities. I prefer to keep it at the soboro stage though.
About 40 calories per tablespoon
Ways to use soboro
I'll show soboro in use in future bentos, but here are just some ideas to get you going:
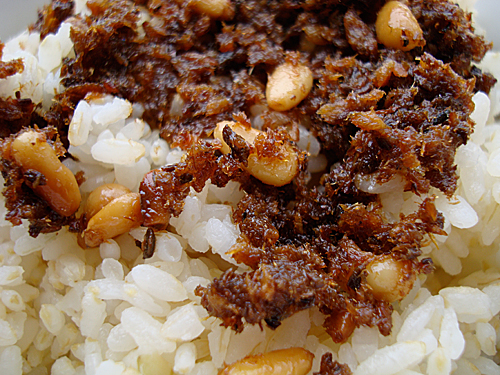
- The classic - soboro bento, which is a take on soboro don (or soboro donburi) - soboro on top of plain rice. It's nice to top a soboro bento with some sansho powder. Example here.
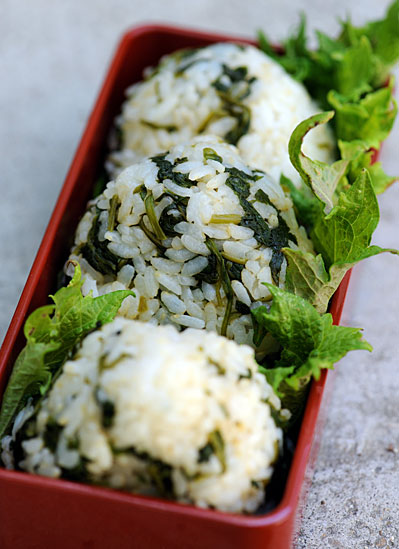
- As an onigiri filling. Make a little clump of cooled soboro for this. If your soboro is too oily, the grease may leak out and make the onigiri fall apart, so you may want to wrap it in nori or keep it wrapped in plastic wrap.
- Mixed with egg for a soboro-tamagoyaki. Since the soboro is fairly salty, you'll want to keep the egg mixture low in salt.
- Stir fried with vegetables. The soboro acts as seasoning as well as protein.
If you enjoyed this article, please consider supporting this site by becoming my patron via Patreon.
Basic taco meat mix
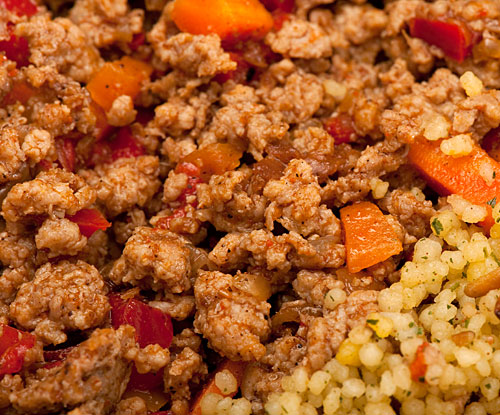
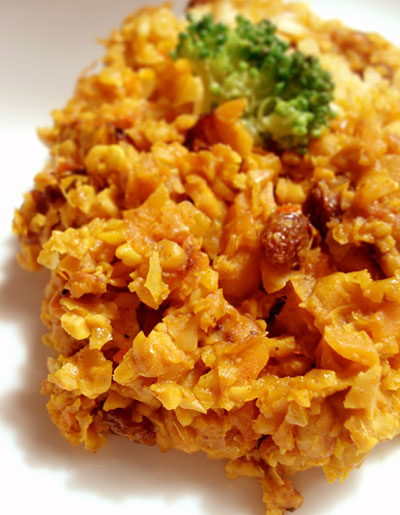
It's hard to believe that I have never posted this really basic basic, but looking though my archives I have not. So here it is, a 'taco meat' mix that I make all the time in some quantity, freezing in portions. It can be used in tacos of course, as well as a sort of Western-tasting soboro to top rice. Try it in pita bread pockets too. I try to get as many vegetables as I can into the mix, making it almost an all-in-one type of recipe.
This most recent batch was made by The Guy by the way, proving that it's quite fuss-free...provided your Guy (or Girl, whichever designation fits the non-cooking partner in your household) doesn't mind chopping vegetables, or else can use a food processor. (In the photo it's packed with some spiced couscous, which is what you see in the right bottom corner.)
Recipe: Basic taco meat mix
Makes enough for at least 8 to 10 tacos, or 4 to 5 bentos used as soboro
- 1 kg (2 lb 2 oz) lean ground beef
- 1 red pepper
- 1 yellow pepper
- 1 medium carrot
- 1 medium onion
- 2 garlic cloves
- 3 Tbsp. tomato paste
- about 1/3 cup water (about 80ml)
- oil for cooking
- 1 Tbsp red chili powder, or more to taste
- 1 Tbsp sweet paprika powder
- 1 tsp. ground cumin
- 1 tsp. salt (or to taste)
- freshly ground black pepper
Chop up all the vegetables quite finely. If you have kids or picky adults to feed, using yellow and red peppers sort of disguises them better than using green peppers, though those work just as well.
Heat up a little oil in a large frying pan over high heat. Sauté all the vegetables until limp - don't let them burn though. Add the ground beef, and sauté until browned. Add the tomato paste and water and stir.
Clear a little space in the pan and add the spices; sauté a bit to bring out the aromas. Stir into the meat. Season with salt and pepper. Tip: Let a little bit cool down to room temperature before tasting, to make sure it will be good when cooled and packed in bentos.
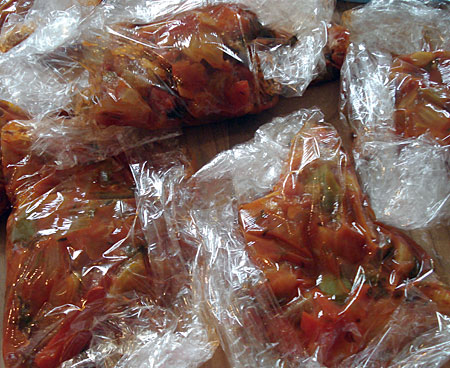
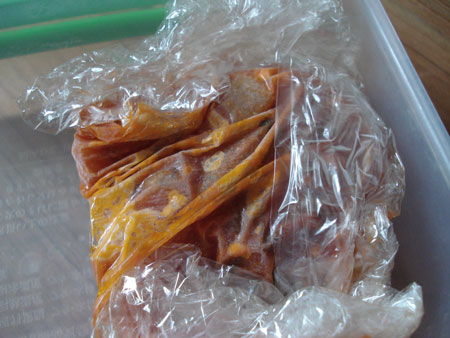
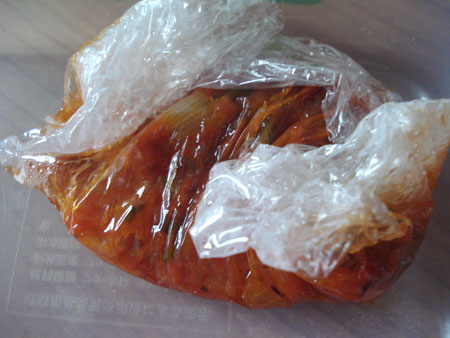
To freeze, let cool and divide into portion sizes of your choice in plastic bags or containers. This will keep in the freezer for a month or so.
About 40 calories per tablespoon, depending on how lean our ground beef is.
If you enjoyed this article, please consider supporting this site by becoming my patron via Patreon.
Bento filler and staple: Sweet stewed haricot, navy or white beans (Ingen no nimame)

Nimame (煮豆 にまめ), or stewed beans, are a standby item for bentos. They are usually rather sweet, though not dessert-level sweet, and serve the purpose of a hashi yasume or "chopstick rest" (see anatomy of a Japanese meal), a little something that contrasts in flavor and texture from the rest of the bento.
While it takes rather long to cook these, like most bean dishes, this is a terrific staple item. The beans keep for at least a week in the refrigerator, and freeze well in small batches too. Tuck in a spoonful in any bento for something a little sweet, a little salty, and good for you.
You can make nimame with any kind of dried beans, but here I've specified white or navy beans, or haricot beans, which are widely available and inexpensive. You could use cannellini beans instead.
You'll notice that the only remotely exotic ingredient used here is soy sauce, so anyone can make this! Yes it's still authentically Japanese. (It's another one of my mom's recipes.)
Recipe: Sweet stewed haricot, navy or white beans (Ingen no nimame)
- 200 g / about 7 oz. or 2 U.S. cups of dry white or navy or haricot beans
- 50g / about 1/4 cup raw cane sugar or sucanat; you can use white sugar or your preferred artificial sugar substitute here
- 1/2 tsp. baking soda (重曹 じゅうそう juusou in Japanese)
- About 1 Tbs. soy sauce
- A drizzle of honey (optional)
Sort through the beans and take out any broken ones or small stones, etc. Rinse the beans and cover with plenty of water in a large pot or bowl. Leave for at least 4 hours or overnight.
Drain the soaking water away, and put the beans in a pot with fresh water to cover. Bring to a boil, then throw away the water. This gets rid of much of the surface scum on the beans. Rinse the beans again, and fill the pot with more fresh water. Add the baking soda to the water. (The baking soda helps to make the beans more tender, but you can omit it.)
If you're cooking the beans conventionally, bring the beans to a boil, lower the heat, and cook for about 40 minutes to an hour until the beans are firm but tender. You can tell when they are tender by taking one out and eating it!
You can also use a crockpot or slow cooker in the same way, though it may take longer to cook.
If using a pressure cooker: Close the lid, and heat the pot until it's up to pressure, then lower the heat and cook for about 5 minutes. Release the pressure until you can open the lid. (Follow the manufacturer's instructions.)
Add the sugar to the pot, and simmer for about half an hour. This gives them that caramel color. Add the soy sauce and the honey, and simmer for an additional 10-15 minutes. (You can add these with the sugar if you want to save some steps, but the beans won't be as shiny and burnished.)
Use a paper or aluminum foil otoshibuta
This is optional, but if you want really perfect beans, you'll want to use a temporary "lid" made of a piece of parchment paper or aluminum foil, crumpled up to fit right on top of the beans in the pot, with holes poked in it, for the second stage of the cooking process (when you add the sugar) onwards. This is called an otoshibuta (落としぶた)and the rationale for using it is explained in this recipe for stewed eggplant.
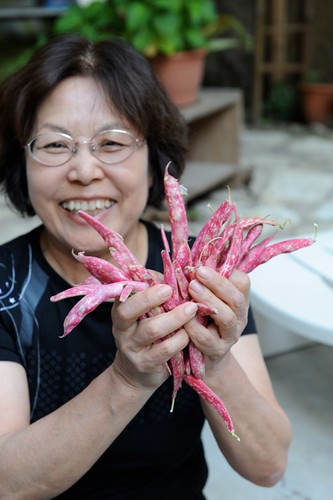
Using undried fresh beans
If you can get a hold of undried fresh beans, you can use them instead of dried beans. You don't need to soak them in advance. Here my mother is holding up a bunch of coco rouge, a type of fresh bean that is available in the markets in Provence from mid-summer to fall. (I believe they are borlotti beans or cranberry beans, or very close to them.) Yep, she really loves her beans, which is why she's looking so happy! (Well that and the sun, weather, and whole vacation thing.)
If you enjoyed this article, please consider supporting this site by becoming my patron via Patreon.
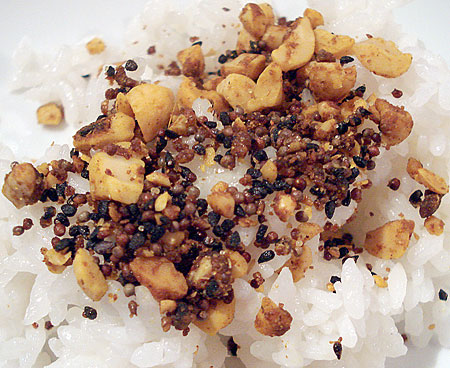
Bento filler staple: Walnut miso paste for cooked vegetables
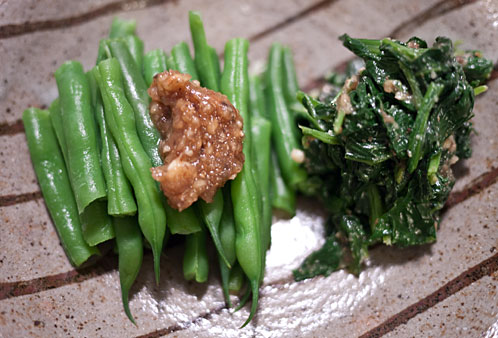
Quickly blanched or boiled vegetables are great to tuck into bentos, but they can taste quite bland on their own. This walnut and miso paste, a recipe from my mother, has a sweet-savory, deeply nutty flavor that works well with all kinds of plain blanched, steamed or boiled vegetables. It also tastes very fall-like to me because of the walnuts. Just mix a little bit with the vegetables as I've done here with the blanched spinach, or put a half-teaspoon or so on top of the vegetable as shown with the green beans, and mix it together when you eat it. I think it works best made in small batches, enough for a week's worth of vegetable sides, but you can make it in bigger quantities and freeze it if you prefer.
Recipe: Walnut miso for blanched vegetables
Makes about 1/3 cup, enough for several bento-sized vegetable servings
- 1/2 cup (about 1 oz / 33 g) shelled walnut kernels
- 1 Tbsp. miso of your choice (I used a dark brown miso made from black soy beans here, but use whatever you have)
- 1 Tbsp. mirin
- 1/2 Tbsp. raw cane sugar - regular white sugar is fine, or use the sweetener of your choice (if you're on a sugar-free regimen use a sugar substitute)
Dry-roast the walnuts in a frying pan over medium heat, stirring occasionally, until the kernels start to brown a bit and smell nice and toasty. Remove from the pan before they get burned. Let cool enough to handle, then wrap them up in a paper towel and rub them together until most of the outer skin is removed. Open up the paper towel and remove the skinned kernels. If there's a bit of skin left on them there's no problem, but removing most of the skin makes the nutty taste of the walnuts come through better. You can skip the skin-removing step if you like, but don't skip the toasting part.
Once the walnuts are toasted and skinned, put them in a mortar and pestle, or better yet a food processor with chopping blade, and crush them up as finely as you prefer. I like it to be quite fine with a few small chunks. Add the mirin, miso and sugar and stir well until combined. (If you can't find or can't use mirin, either use the same amount of sake with a pinch more sugar, or just leave it out.)
Store in a tightly sealed container in the refrigerator for up to a week. To use, add as much as you like to blanched, boiled or steamed vegetables.
If you enjoyed this article, please consider supporting this site by becoming my patron via Patreon.
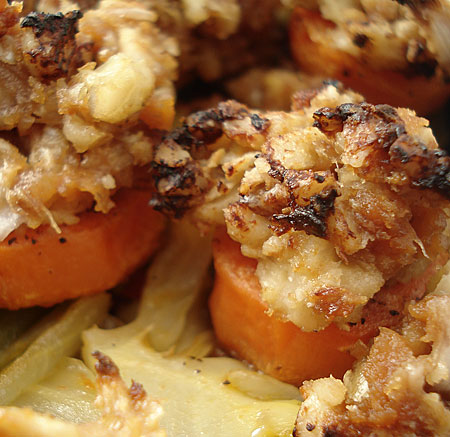
Bento sized mini cabbage rolls
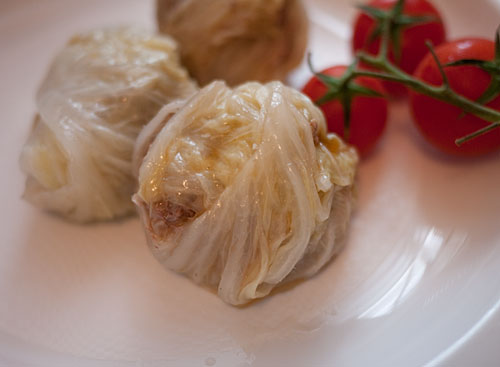
I love cabbage rolls, whether rolled or deconstructed, but regular sized ones are a bit too large and sloppy in my mind to put into all but the largest bento boxes. These are little bento sized cabbage rolls, just a bit bigger than a ping-pong ball. They aren't too showy to look at, but are deliciously juicy hot or cold. They are kept compact and slim by using napa or Chinese cabbage instead of regular cabbage leaves, since napa cabbage leaves are thinner and more tender, and using the smaller inner leaves that are about 10 inches (25cm) long.
Another feature of these mini cabbage rolls is that I tried making them in a rice cooker, and they came out great. I've also given instructions for making them on the stovetop, but if you're looking for more ways to utilize your rice cooker, you may want to try it out that way.
These little cabbage rolls freeze beautifully, which is why I've put them in the Johbisai/staples section. Despite their meaty taste, they are fairly low in calories since they contain all of the chopped up stem parts of the cabbage leaves.
Recipe: Bento-sized mini cabbage rolls
Make about a dozen small cabbage rolls
- 12 smallish (about 10 inches / 25 cm long) napa or Chinese cabbage leaves, taken from the inner parts of the cabbage
- 12 oz (350g) ground pork, ground beef, or a mixture of the two
- 1 small onion, finely chopped (about 4 Tbsp)
- 1 teaspoon grated fresh ginger
- 1/2 teaspoon salt
- black pepper to taste
- 1/2 Tbsp soy sauce
- 3 Tbsp plain, unseasoned dry bread crumbs or panko
- 3 cups (660ml) chicken or vegetable stock or dashi, or the same amount of water with chicken or vegetable stock cube/granules added
Put the washed napa cabbage leaves in a pot and cover with water. Bring up to a boil, then turn the heat off. Leave to cool, then take the limp leaves out and squeeze them out. Alternatively, put the leaves on a plate and cover with plastic wrap, and microwave for 7 minutes until the leaves are limp. Leave to cool, then squeeze out the moisture.
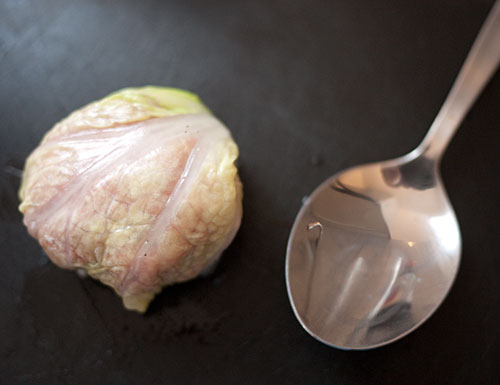
Take each leaf and spread it out, and cut out the stem part. You'll be left with a leaf with an inverted V shape cut out of it.
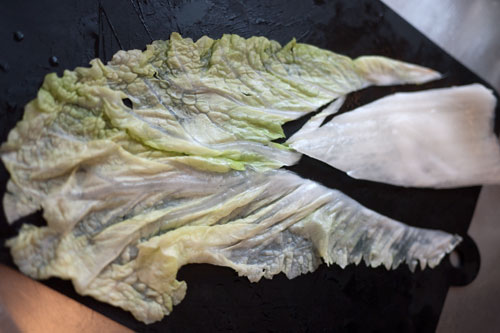
Set the leaves aside, and chop up the stems finely. Squeeze out any excess moisture from the chopped up stems.
Put all the ingredients, except for the set-aside leaves and the stock, into a bowl and mix together well with your hands. Form into 12 balls.
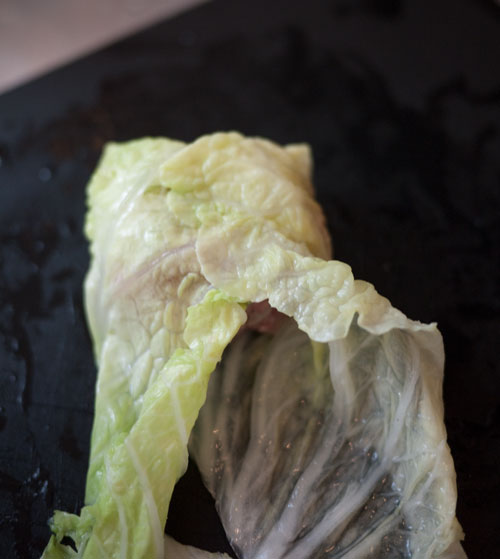
Now to start rolling. Put a leaf in your work surface, and put a golf ball sized meatball on the leafy end. Wrap the end of the leaf over the meatball.

Wrap the two sides over the meatball.
Bring the tail ends of the leaf up and over the meatball.
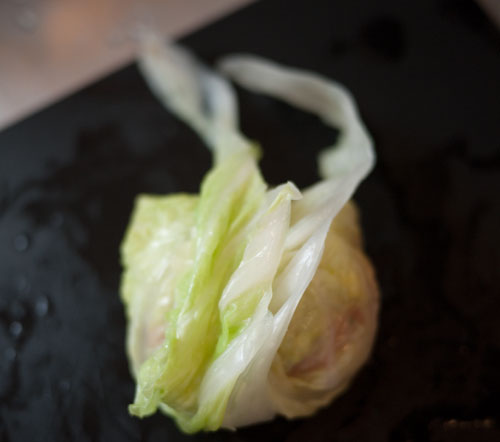
Tuck the ends under. Here's one completed cabbage roll (or cabbage ball...), next to a tablespoon for size comparison.
If you're using a rice cooker: Put the soup stock in the inner bowl. (Note that if you use dashi stock the cabbage rolls will taste more Japanese, but regular soup stock is fine too.) Put the cabbage rolls, seam side down, in the bowl. You can pile them right in, like so.
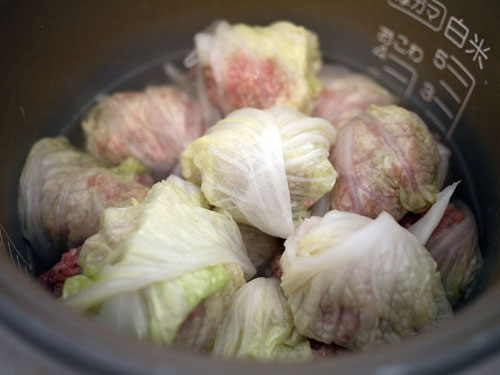
Close the lid, and set the rice cooker to cook. Note that I used a 5-cup Zojirushi rice cooker for this, similar to this one but about 20 years old! If your rice cooker is larger or smaller, cooking times may vary (if you have a small rice cooker with a loose lid, watch out for boil overs; you might want to use the stovetop method instead, or cook the cabbage rolls in two batches). I just switched it on and left it until the cooking cycle stopped. The rolls should cook for at least 20 minutes, or until the rolls feel firm when you poke them. Cooking them for a bit longer doesn't harm them at all - they just get more tasty.
If you're cooking them on a stovetop: Use a pan that is large enough to allow the rolls to be placed in a single layer, and has a tight fitting lid. Put in the stock, and add the cabbage rolls. Bring up to a boil, then lower the heat so that it's just simmering. Put on a lid, and let simmer for 40 minutes.
To use in a bento, drain off the excess liquid well. They can be eaten at room temperature, or heated up for a couple of minutes in the microwave.
To freeze these, put in a freezer-safe and microwave-safe container with a little of the cooking liquid. They'll keep in the freezer for about a month.
Footnote: I have to admit that I haven't been doing a whole lot of cooking of any kind in the last few weeks, what with having surgery, the hospital stay, the house still in a mess, and other large and small annoyances. But I'm slowly getting my cooking and bento-oing mojo back!
If you enjoyed this article, please consider supporting this site by becoming my patron via Patreon.
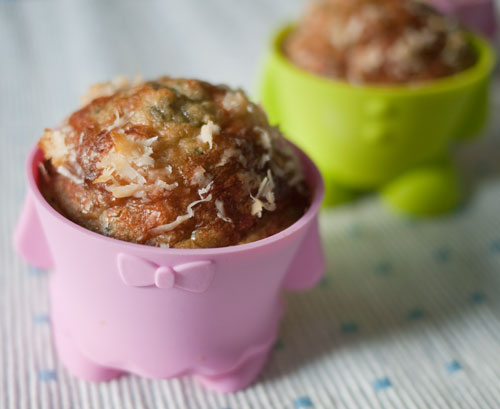
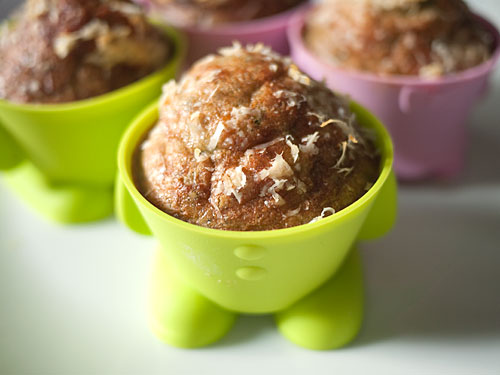
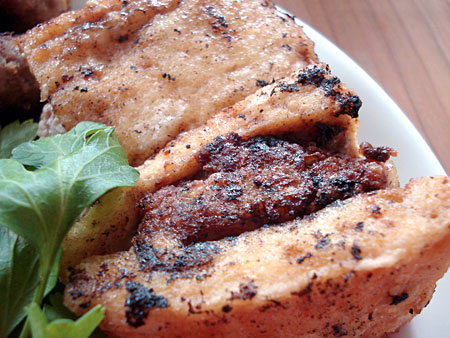
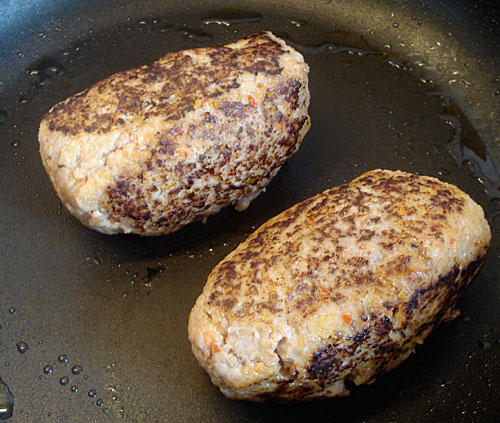
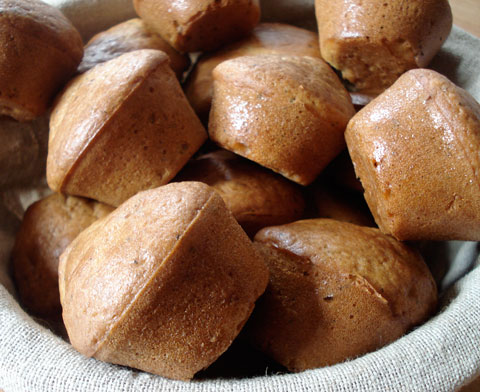
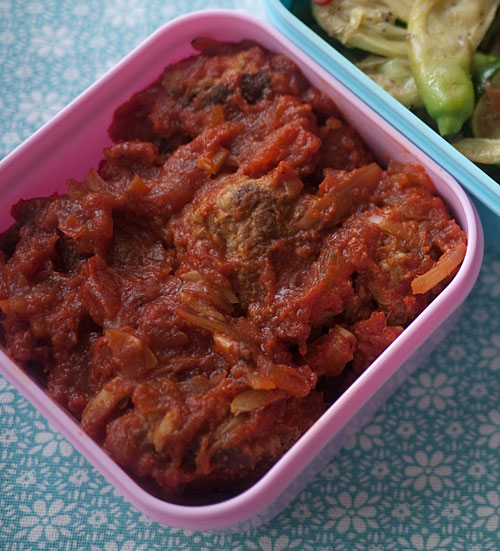
Bento sized mini-meatloaves
Who doesn't love a meatloaf? (If you eat meat, that is.) Sliced leftover meatloaf is great in sandwiches, and it's also very nice in a bento box. Meatloaves also freeze very well, since they have a moistness to them.
While I do like to make a big meatloaf now and then, I also like to make these mini-sized meatloaves specifically for the bento freezer stash. I often reserve a couple for dinner, and wrap and freeze the rest.
You could use your own favorite meatloaf recipe for this, but here is one in case you need it. The key point here is the size, perfect for bento boxes and sandwiches.
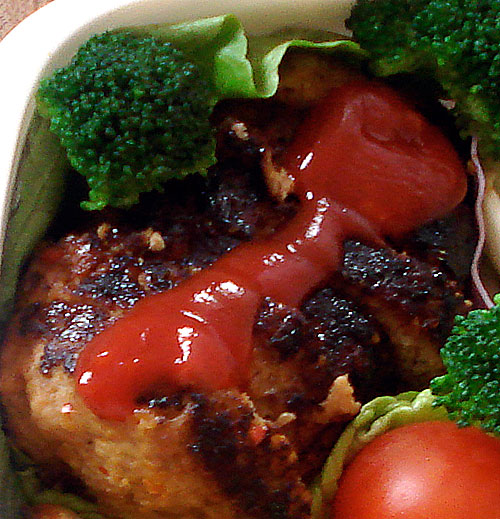
See the mini-meatloaves in action in this bento!
Recipe: Mini-meatloaves
This makes 10 little meatloaves, each about 170g / 6oz. each
- 1.5kg / about 3 1/4 lb combination of ground beef, veal and pork (500g / a bit more than 1 lb each)
- 2 large sweet bell peppers
- 2 medium onions
- 1 medium carrot
- A 25cm / 8 inch length or so of celery stalk
- 1 cup breadcrumbs from whole wheat sliced bread
- 1 large egg
- 1 tsp. salt
- Ground nutmeg
- Ground pepper
Preheat the oven to 200°C/400°F. Line a baking sheet with kitchen parchment paper for easier cleanup.
Chop up all the vegetables finely. A food processor is very helpful in this. Mix well with the breadcrumbs and egg to form a sort of slurry. Add the salt, pepper and nutmeg.
Put the ground meat mixture in a large bowl, and make a well in the middle. Pour the slurry you made above into the well, and mix the whole thing together very well with your impeccably clean hands.
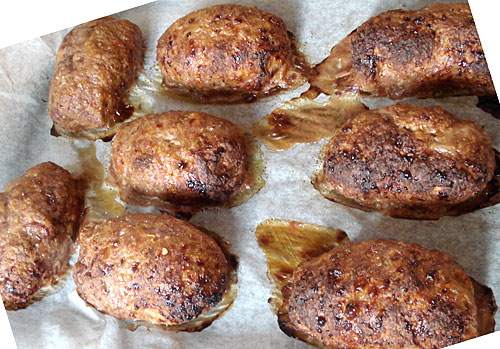
Divide the mixture into ten equal amounts. Form each into a small loaf about 15cm/6 inches or so long, and about 5cm / 2 1/2 inches or so in diamater. Line them up on your baking sheet. (Use two sheets if they don't all fit.)
Bake for 10 minutes, then lower the heat to 165°C / 330°C, and bake for an additional 30 minutes.
What if you don't have an oven? You can cook these little loaves in a frying pan. Just brown on all sides by rolling around, put on a lid, lower the heat and steam-cook for about 10-15 minutes. When they are done, when you poke a fork in the middle the juices should run clear.
Cool down before wrapping up in aluminum foil or plastic wrap and freezing.
Notes
- I find the 3-meat mixture to be the best for a moist meatloaf.
- These are flavored rather neutrally, and are light on salt, so you can vary the flavors if you like. For instance, you can roll them around in a little ketchup and/or Bulldog sauce, or soy sauce, or your favorite barbeque sauce. In the photo at top I've just squirted a bit of ketchup on the slices.
- The 6 inch / 15 cm long size is great for bentos and sandwiches. Sliced crosswise, the pieces are perfect for bento boxes, and sliced lengthwise they fit a sandwich very well.
- For extra flavor and richness, not to mention fat, wrap the meatloaves in bacon and cook as described.
If you enjoyed this article, please consider supporting this site by becoming my patron via Patreon.
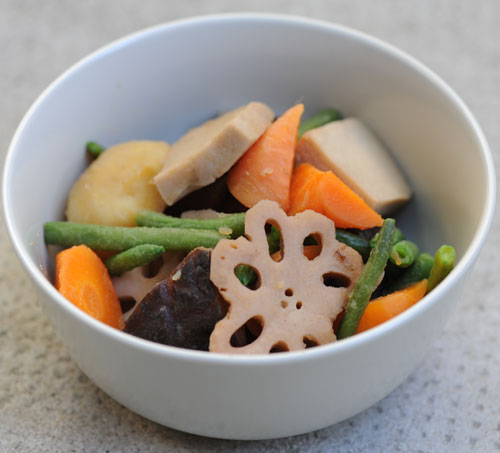
Bento staple: All-purpose winter vegetable mix for rice and more
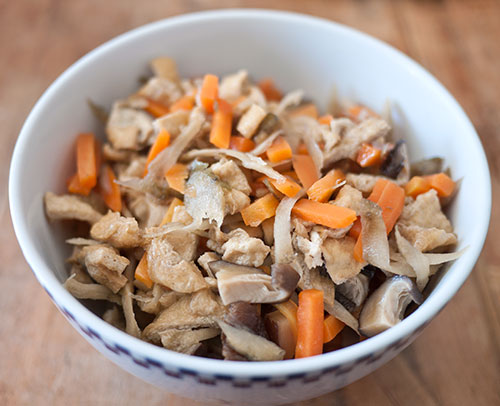
This is a very versatile vegetable-only or vegetable and chicken mix that can be kept in the refrigerator for up to a week, or for a month in the freezer. As long as you use a vegetarian/vegan protein it will be vegan/vegetarian, but if you are an omnivore you can use chicken. Let me give you the recipe first, and then show you a couple of ways to use it.
Recipe: All-purpose vegetable or vegetable-and-chicken mix
This makes about 800ml or 3.5 U.S. cups.
The basic ingredients are very Japanese but I have given some alternatives for the slightly harder to get ingredients. In each case the first listed one is the best choice.
(The instructions may look a bit complicated but they really aren't. What you're doing is just chopping up some root vegetables, mushrooms and protein and simmering it in a stock and sake/mirin/soy sauce/salt mixture. The resulting mixture can then be combined with other foods.)
- 4-5 dried shiitake mushrooms, OR 4 fresh shiitake mushrooms, OR 6-8 button mushrooms
- 1 medium carrot
- one 6-inch piece of burdock root (gobo) OR salsify, OR a medium parsnip
- 1 aburaage (fried bean curd), or 120g / 4 oz boneless skinless chicken (thigh is preferred but breast is ok), or an equivalent amount of firm vegetarian protein of your choice such as seitan, quorn, etc.
- 400ml / 1 3/4 U.S. cups of the shiitake mushroom soaking liquid, with added dashi stock if there's not enough. If you aren't using dried shiitake, use all dashi. You can also use water plus 1 teaspoon of dashi granules. If you don't have any of the above, use your favorite vegetable stock.
- 1 tablespoon sake (omit if you don't have this)
- 1 tablespoon mirin (use 1/2 tablespoon sugar if you don't have this)
- 1 1/2 tablespoon light soy sauce, OR 1 1/2 tablespoon dark soy sauce
- 1/4 teaspoon salt
The mushrooms: If you're using dried shiitake mushrooms, cover them in water and let them soak and reconstitute. This usually takes at least an hour, so you may want to put the mushrooms in water and leave them overnight. Take the mushrooms out of the soaking liquid and squeeze out tightly. Reserve the soaking liquid. Slice the mushrooms thinly (whichever kind you are using). Set aside.
The root vegetables: Peel and cut the carrot and the burdock root or burdock-alternatives into small matchsticks (fine julienne). Put in a bowl and cover with water, and leave to soak for about 5 minutes. If you're using burdock root you will need to change the water once or twice to get rid of some of the bitterness. If the water is very dark, just drain it off, fill with fresh water, and soak for a few minutes more before draining again.
The protein: If you're using fried bean curd, pour boiling water over it to get rid of the surface oil. When cool enough to handle cut into fine julienne. If using the alternative proteins, cut them into small pieces.
Put the 400 ml / 1 3/4 U.S. cups of mushroom soaking liquid + dashi or stock (or all dashi or stock if you're using fresh mushrooms), soy sauce, sake, mirin, and salt into a pan. Add the vegetables and mushrooms and bring it to a boil. Lower the heat and simmer for 10 minutes. Add the protein you are using and simmer for another 4-5 minutes. Take off the heat and let it cool down in the cooking liquid.
Store in a covered container in the refrigerator for up to a week, or in the freezer for up to a month.
Note: On its own this may taste a bit salty, but keep in mind that you'll be using it by combining it with a bland food, so don't worry if you find it a bit strong when you taste it on its own. (And conversely if it tastes a bit low in salt, add a bit of soy sauce and/or salt.)
What to do with the mix
As I showed you in the bento posted yesterday, you can use the mix to make a very tasty and fiber-rich takikomi gohan or mixed rice. There are two methods:
- If you're cooking fresh rice: Rinse the rice as usual (see intructions). When you put the rice in the pot or rice cooker, add 4 tablespoons of the cooking liquid the mix is in, and top up with water to the required amount. Cook the rice as usual. When you reach the heat-off, steaming stage - or if you're using a rice cooker, when the cooking stage is over - put 1 cup of drained mix per 1 cup of raw uncooked rice you put in (so 1/2 cup per 1 cup of cooked rice) on top of the steaming hot rice, put the lid back on and let it rest for 10 minutes or so. Open the lid and mix the rice and the mix together evenly.
- If you're using premade plain rice: Heat up the rice so it's piping hot. Add 1/2 cup of drained mix and 1 tablespoon of the cooking liquid per cup of precooked rice. Cover and let it rest for 5-10 minutes, then mix it all together.
The rice below is actually the mix combined with shari or sushi rice - that is, plain rice flavored with sushi vinegar. It makes a great vegetable sushi on its own, or you can put other things on top to make it into a chirashizushi, or stuff it into prepared fried bean curd pouches for inarizushi. For sushi rice, add 1/2 cup of drained mix per 1 cup of prepared sushi rice, and don't add any of the cooking liquid (since the rice is already flavored with the vinegar mix).

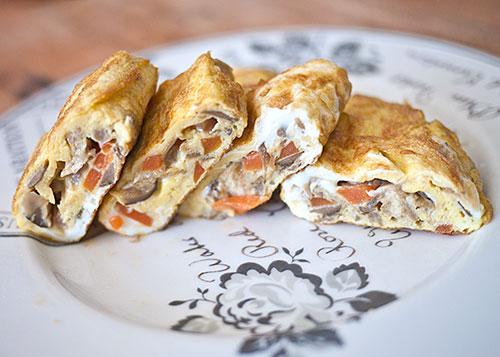
You can also add the mix to egg for tamagoyaki - use the traditional multi-egg method or the 1-egg method. Just add 1 tablespoon of the mix and 1/2 teaspoon of the cooking liquid per egg. (Some people may want to add a pinch of salt, but I prefer it to be less salty.) Mix it up and cook as you would a plain tamagoyaki - don't be too worried about thin layers though, just make a tight little omelette basically. This is a nice alternative to a regular tamagoyaki.
I'll show you one more way to use this mix next time, that uses tofu - a classic shojin ryouri (mostly vegan Zen Buddhist cuisine) dish.
If you enjoyed this article, please consider supporting this site by becoming my patron via Patreon.
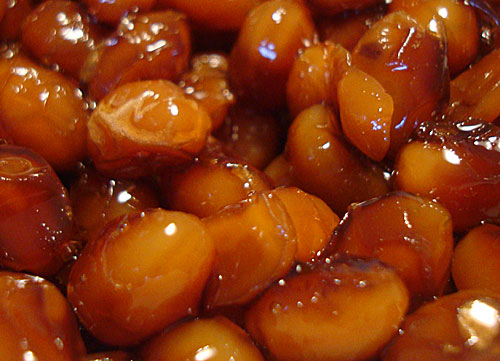
Budo Mame or Budoh Mame: Sweet-salty soy beans (Bento filler)
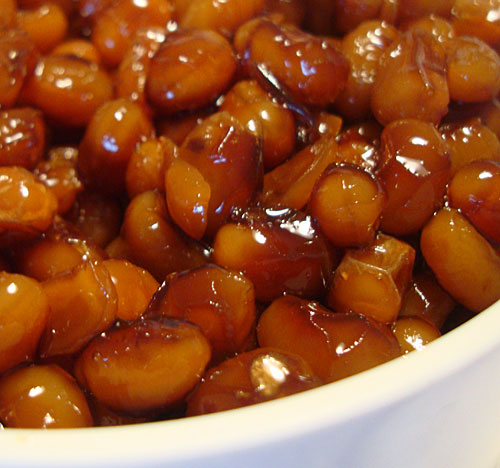
There are many recipes for stewed or simmered beans in Japanese cooking, but this is one of the simplest, and I'm fairly sure, one of the oldest recipes in existence. It traditionally only uses three ingredients -- soy beans, sugar and soy sauce -- but I've added a little salt too since I like the saltiness to be a bit more assertive to balance the sweetness. The beans have a unique, chewy texture that is unlike any other bean dish I've ever had. The soy beans become almost caramelized, yet are not cloyingly sweet.
The name budo mame means 'grape beans'. I'm not totally sure what it means, but it probably means that the beans take on a shiny appearance rather like grapes. They do indeed look like black grapes when made with black soy beans (kuromame), but here I've made them with regular white or light brown soy beans, which are a lot easier to get for most people.
Just a spoonful or so tucked into the corner of your bento box makes a nice change of pace, even a mini-dessert of sorts (see "chopstick rest" below). And of course, it's packed with protein.
A pressure cooker is highly recommended to make this, but you can cook it without one too.
Recipe: Budo Mame or Budoh Mame
Makes about 3 cups cooked
- 2 cups dry soy beans
- 1 1/2 cups sugar
- 2 tablespoons soy sauce
- 1 teaspoon sea salt
If using a pressure cooker: Rinse the soy beans. Put in the pressure cooker and add enough water so that it comes up to about 2 inches / 5cm above the beans.
Put a small, heatproof plate or the steamer rack that came with your cooker on top of the beans. This prevents any loose soybean skins from flying up to the underside of lid and clogging up the steam vents (this can lead to a lot of liquid bubbling out from the top, which gets rather messy).
Put the lid on, lock and bring up the pressure, following your pressure cooker's instructions. Lower the heat, and cook under pressure for 20 to 25 minutes. Release the pressure and open the lid. Skim off any loose skins.
If using a conventional pot: Rinse the soy beans, and soak in enough water to cover for at least 12 hours. Drain the soaking water, and put the beans in a heavy-bottomed pot, with enough fresh water added to come up to about 2 inches / 5cm above the beans.
Bring the pot up to a boil, and lower the heat so that it's just simmering. Cook for 4-5 hours or until the beans are soft, and smush easily when you take one between your thumb and forefinger and press. Skim off any loose skins.
For both methods: After the soy beans have been cooked, scoop out some of the cooking liquid if needed, so that the beans are only covered with about an inch / 2.5cm of liquid. Add the sugar, and simmer slowly for about an hour to 90 minutes. At some point the beans will start to shrink and turn quite dark and caramelized looking. When this happens, add the soy sauce and salt, stir, and simmer for 15-20 minutes more. If the liquid boils away too much, add some of the reserved cooking liquid.
Leave to cook in the cooking liquid. The beans improve in flavor and texture when they are cooled.
The beans will keep in the refrigerator for at least a week.
Extras
Lucky beans
Beans are considered to be very lucky in Japanese foodlore, so the black kind of budo mame often make an appearance as part of osechi, the New Year's feast foods.
Chopstick rest dishes
Japanese meals usually do not have a sweet or dessert course per se (sweet things are reserved for in-between snack time, or to eat with tea). However, many meals, especially bentos, have a little side dish with a contrasting flavor or texture from the main dishes. This contrasting side dish is called a hashi yasume (箸休め) or "chopstick rest". (This is not the same as a hashi oki (箸置き)), the the little object usually made of ceramic that chopsticks are rested on during a meal.) These sweet-salty beans are a perfect example of a "chopstick rest"; sweet enough to almost be a dessert, yet still salty enough to eat with rice.
Pressure cooker in my luggage
I actually hauled a pressure cooker all the way from Switzerland to Japan in my luggage for this visit. As I've written about previously, pressure cookers are ubiquitous in Switzerland, and well made to boot by manufacturers like Kuhn Rikon. While pressure cookers have really been gaining in popularity in Japan (they are all over the shopping channels on TV), they seem to be much more expensive for similar quality.
I've been telling my mother that she needs pressure cooker for years, since she loves to cook beans so much. She's been a bit afraid of them, as many people are, but after trying it out to make these classic sweet-salty soy beans, she is convinced. With a pressure cooker, it cooked up in about 2 hours. Without, it would have taken all day. Pressure cookers are well suited for many traditional Japanese dishes, so I think my mother is really going to enjoy hers!
If you enjoyed this article, please consider supporting this site by becoming my patron via Patreon.
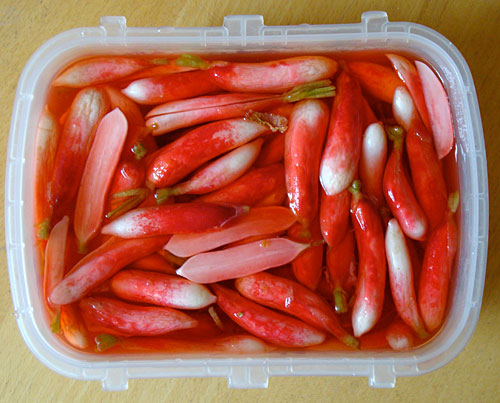
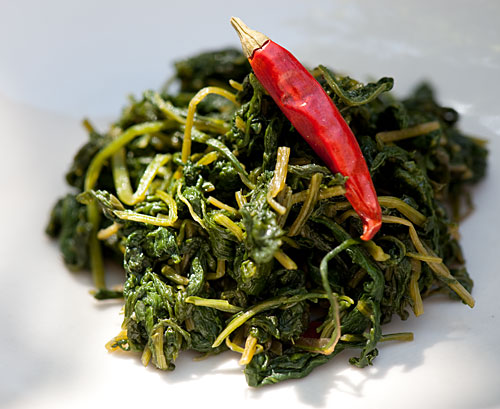
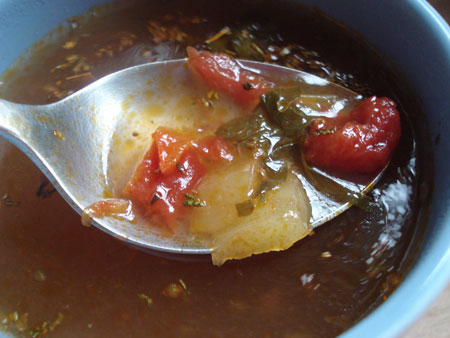
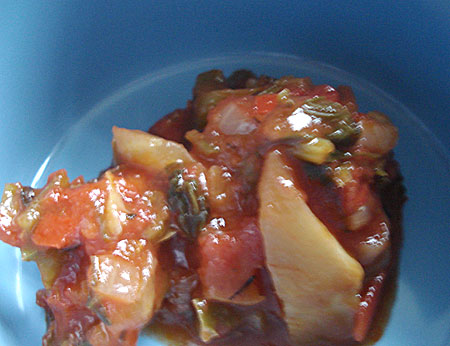
Cooked to death hot and sweet peppers
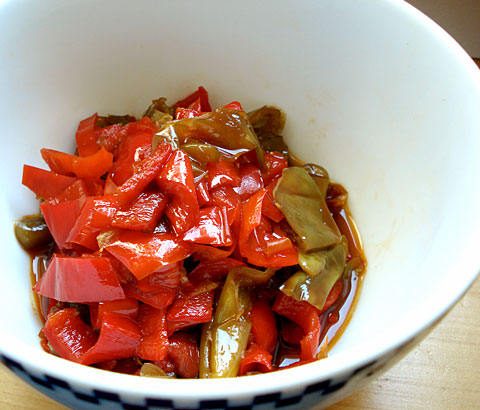
Greenhouse grown peppers are available year round, but summer is when peppers are really in season. I picked up a bushel load of colorful hot and sweet peppers at a market last week, and some of them turned into this item which is great for bento.
It couldn't be easier to make, but does take a little time. A mixture of mildly hot chili peppers and sweet peppers are briefly stir fried in sesame oil, then simmered for about half an hour or more. The peppers are falling-apart soft, spicy, sweet and salty. It's great to tuck into the corner of a bento box, and, well drained of the cooking liquid, also makes a great and unusual filling for onigiri (rice balls).
My grandmother used to make this kind of 'cooked to death' or until very limp (kuta-kuta ni) vegetable dish quite a bit. It's a great way to reduce a big pile of vegetables to a manageable eating amount. This method works well with green beans too. I think it's rather similar to the way some vegetables such as greens are cooked for a long time in American Southern cooking. I'm no nutrionist, but you do eat all of the 'cooking liquor' alongside the vegetables, so nutrition loss may not be so bad, though raw-food advocates may shudder.
The key here is the selection of peppers. The spicy chili pepppers should only be mildly spicy. In Japan you would use shishito peppers. Here I used a variety from Italy that I'm not sure of the variety name of, but it is similarly thin-walled and mild enough not to burn my mouth. Jalapeños or anchos might be good choices too. For the sweet peppers, I used the long red peppers that are called banana peppers, Hungarian peppers or paprikas, depending on who is selling them and where.
Recipe: Cooked to death hot and sweet peppers
- About 10 to 12 small mildly spicy green chili peppers such as shishito or jalapeños
- 4 large long sweet red peppers (You can use green or pale yellow ones instead, but red is more festive and sweeter)
- 1 garlic clove
- 1 Tbs. dark sesame oil
- 2 Tbs. soy sauce
- 1 Tbs. mirin or sweet sherry
- 1 Tbs. brown sugar
- Water
De-seed the peppers. Cut the small chili peppers in to 3 to 4 pieces, and the sweet red peppers into pieces of about the same size. Chop the garlic clove finely.
Heat up a pan with the sesame oil. Add the garlic, and follow with the peppers. Sauté for a few minutes, then add just enough water to barely cover, and the seasoning. Bring up to a boil, then lower the heat to a simmer, and cook until the liquid is reduced to less than half. Take out the pepper pieces, and continue to reduce the cooking liquid until almost gone and syrupy. Add the peppers back, and continue simmering until the liquid is just about gone.
This keeps in the refrigerator for about a week. Use sparingly as a secondary vegetable in bento boxes, as an onigiri filling (drain off the liquid to prevent seeping), mixed with other vegetables or meat or tofu, in sandwiches, mixed with noodles, and more.
See also
Sweet Pepper and Onion Confit is similar, but different!
If you enjoyed this article, please consider supporting this site by becoming my patron via Patreon.
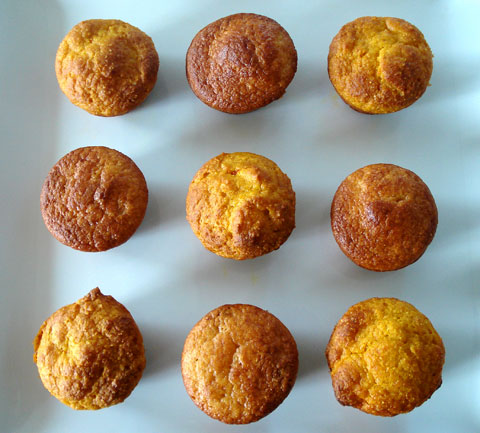
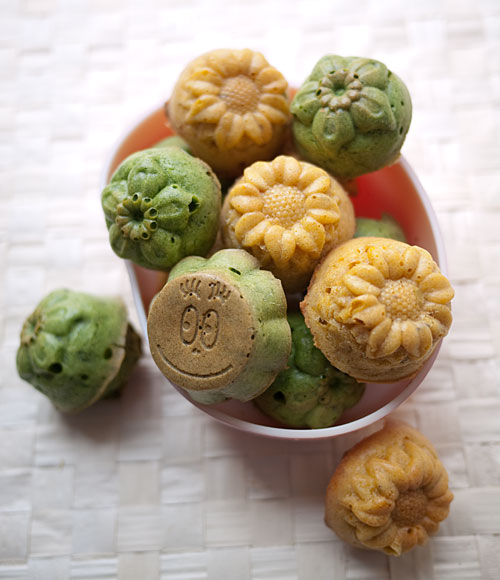
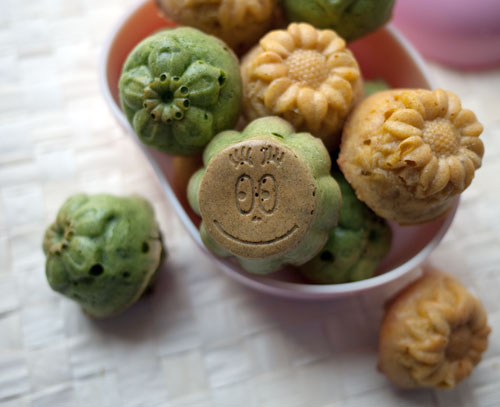
Earl Grey Tea Muffins
One more muffin recipe in this unplanned muffin mini-marathon. These are a bit sweeter than the other muffins I've posted, so are more suitable as in-between-meal snacks perhaps, or even at home for teatime. They are still not overly sweet though, and are featherly light and fragrant. Flecked throughout with fine tea leaves, they sort of taste like an Earl Grey milk tea in muffin form. You can see the tea when you split one open.
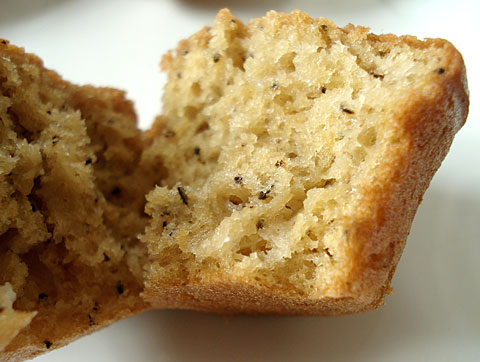
Since each mini-muffin is only 60 calories (120 for regular sized ones), consider carrying these along instead of succumbing to a donut or pastry.
Recipe: Earl Grey Tea Muffins
The dry ingredients:
- 2 cups minus 3 Tbs (230g) all purpose or cake flour (with cake flour they will be lighter, but AP flour works too)
- 1 1/2 tsp. baking powder
- 4 Tbs. Sucanat (see notes) or light brown sugar or raw cane sugar or regular sugar
- Pinch of salt
The wet ingredients:
- 2 large eggs
- 3 Tbs canola oil or light olive oil (or other flavorless vegetable oil)
- 1 1/3 cups buttermilk (or 1 1/3 regular low-fat milk + 1 Tbs. vinegar)
Plus:
- 1 tsp. or 1 teabag fine Earl Grey tea leaves. If your tea leaves are on the coarse side, grind them up a bit in a mortar and pestle, or just crumble them up by rubbing the leaves between your fingers.
Again, the procedure is almost identical to the corn muffins! Muffins are so easy.
Preheat the oven to 180°C / 360°F. Grease or spray non-stick spray onto your muffin tins if needed.
Mix or sift together the dry ingredients.
Beat together the wet ingredients until blended.
Fold the dry ingredients into the wet ingredients, using a spatula. Don’t overmix. Add the tea leaves.
Spoon the batter into the muffin tins evenly. Bake for about 20 minutes for mini-muffins, 25-30 for regular size muffins, until the tops are browned and a skewer stuck through a middle muffin comes out clean. Note: these muffins will puff up quite a bit.
Take out of the muffin tins and cool on a rack - that is, if you can resist eating them hot, since these smell so good!
If freezing, put them in the freezer well wrapped as soon as they are at room temperature.
Notes
Sucanat is a fine grain raw cane sugar. You can find it at health food stores. It’s expensive, but I find I need less of it than regular sugar since it has a lot of flavor. If you can’t get it, use one of the suggested substitutions. (Repeated from the corn muffins page).
Try using different kinds of tea leaves. So far, I've tried some Bitter Orange from Fortnum and Mason, and Apple from Fauchon, as well as Mariage Frères Darjeeling (I'm a bit of a tea-nut). I have to say that Earl Grey is still my favorite - the bergamot really comes through quite strongly. I've gotten the best results using a sort of generic brand tea bag I got in England the last time I was there with very fine leaves. A pairing of tea brewed with the same tea leaves you used for the muffins is nice.
These match very nicely with jam.
If you enjoyed this article, please consider supporting this site by becoming my patron via Patreon.
Gomashio Cookies
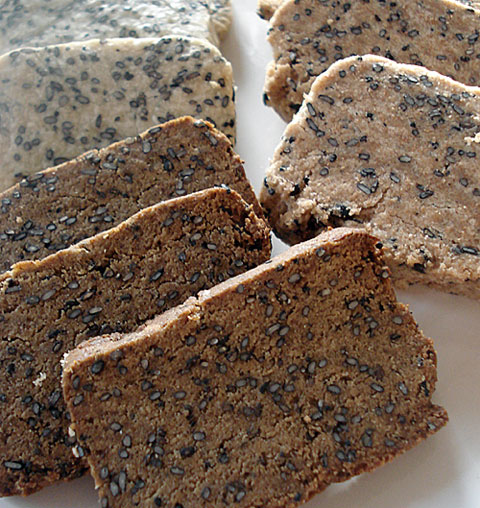
You may eat a healthy bento lunch, but what when you get hungry in-between meals? You could eat some fruit or something, but you may want something a bit more substantial yet easy to transport without succumbing to the lure of Krispy Kreme donuts or a bag of potato chips. These not-sweet cookies are one option.
These dense, shortbread like cookies are not sweet - they are indeed a bit salty, from the gomashio (sesame salt). They are very filling 'in-between' snacks, clocking in at around 80 calories each. They are sort of homemade, not-sweet versions of Calorie Mate Block (see Notes) - they're just as filling with none of the artificial vitamins or sugar, and are loaded with the goodness of sesame. If you like sesame, you will love these.
I've made them in three variations. One is made with white flour and butter, and is arguably the tastiest but least nutritious. The second is made with whole wheat flour, olive oil and sesame oil, and rivals the white flour one in taste - but is a bit crumbly. The third is a gluten-free, vegan version that uses chickpea (gram) flour, tahini and sesame oil. It is quite firm and tasty, and definitely the most nutritious, but may not be to everyone's liking.
Gomashio cookie version 1: Butter and flour
This is adapted from a Japanese cookbook called クッキーがいっぱい! (Kukkee ga ippai - Lots of Cookies). In the book it's represented as a 'healthy cookie'. It's not that healthy, but the gomashio does save it from being totally nutrionally deficient. And, at least according to the local taste testers, it is the best tasting one of the three.
This amount makes 12 cookies, about 80 calories each.
- 50g / 1.75 oz. butter
- 2 heaping tablespoons (about 20g) gomashio
- 100g / 3.5 oz plain all purpose flour
- 2-4 Tbs. (or more) milk or soymilk
The procedure for making all of the cookies is the same.
Cream the butter (putting it in a plastic bag or plastic wrap and smooshing it around in your hands is the easiest way). Add the sesame seeds and mix in well.
Add the flour, and rub in well until the mixture is crumbly. Add the milk little by little until you get a ball of dough that just about holds together.
Put the dough onto a sheet of plastic wrap, and form into a block. Wrap the plastic film around the block, and straighten out the sides of the block so it's a neat rectangle. It should look like this (this is actually a block of Variation no. 3, but you get the idea):
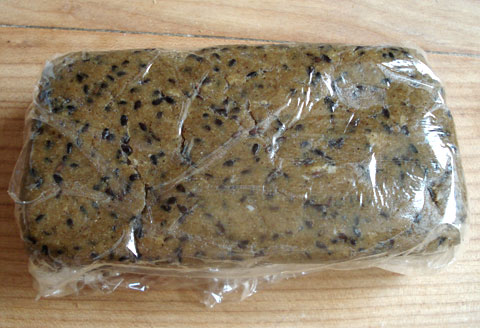
Put in the refrigerator for at least 30 minutes until firm.
Heat up the oven to 180°C / 360°F. Line a baking sheet with kitchen parchment paper or a non-stick silicon sheet.
Slice the dough block into 12 equal slices. Bake for 15-20 minutes until firm and lightly browned.
Variation: Add 2 Tbs. of grated cheese to the dough.
Gomashio cookie version 2: Whole wheat and sesame oil (vegan if you use soymilk)
Makes 12 cookies, about 85 calories each. This version came in a close second in taste tests.
- 50g / 1.75 oz. olive oil and sesame oil combined (about half and half)
- 2 heaping tablespoons (about 20g) gomashio
- 100g / 3.5 oz whole wheat flour
- 2-4 Tbs. (or more) milk or soymilk
The procedure is the same as for the flour and butter version, except that there is no need to cream the oil of course. You may need a bit more milk or soymilk to bind the dough.
Gomashio cookie version 3: Chickpea flour and sesame oil (gluten-free, vegan)
Makes 12 cookies, about 85 calories each. This version was pronounced 'interesting and curiously addictive' by taste testers.
- 30g / 1.05 oz tahini
- 2 Tbs. sesame oil
- 2 heaping tablespoons (about 20g) gomashio
- 100g / 3.5 oz chickpea flour (gram flour)
- 2-4 Tbs. (or more) soymilk
Again, the procedure is the same as for the other versions. This one needs more liquid (soymilk) than the others - just keep adding lin little dribbles until the dough holds together. You may want to add a couple of tablespoons of sugar to this one, since the tahini can be a bit bitter.
These cookies can be crumbly, so carry them in a small bento box. They keep for a couple of weeks in an airtight container, so you could even stash them in a locker.
Notes: About Calorie Mate
Calorie Mate Block is a Japanese meal replacement bar, that looks and tastes like a small block of shortbread. When I was in high school, I used to eat Calorie Mate Block as an emergency snack quite a bit. They come in individually sealed foil packs, and are 'only' 100 calories each. They are small and handy to carry around, and really hit the spot when I was up late studying for exams. (It's the fate of Japanese students to study long, long hours for exams.)
A few weeks ago, I spotted some Calorie Mate Block at our local Japanese grocery store, and bought it in a fit of nostalgia. I don't know...it doesn't taste nearly as good as I remember. But, it is just as filling.
Here's Kiefer Sutherland as Jack Bauer from 24, in a commercial for Calorie Mate.
<
div style="width: 425px; margin-left: auto; margin-right: auto;>
If you're curious about how Calorie Mate Block tastes, and can't get it locally, you can buy it from J-List. There are also Gel and canned drink versions of Calorie Mate...but we won't go there.
If you enjoyed this article, please consider supporting this site by becoming my patron via Patreon.
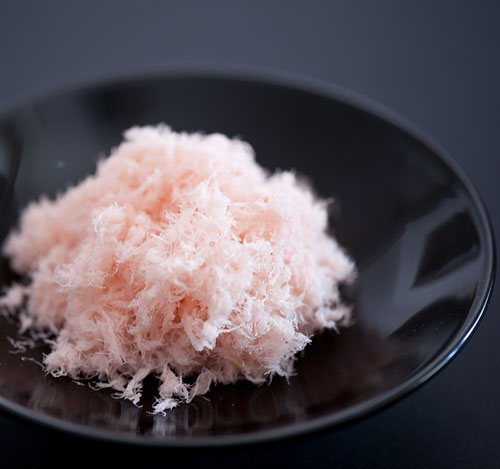
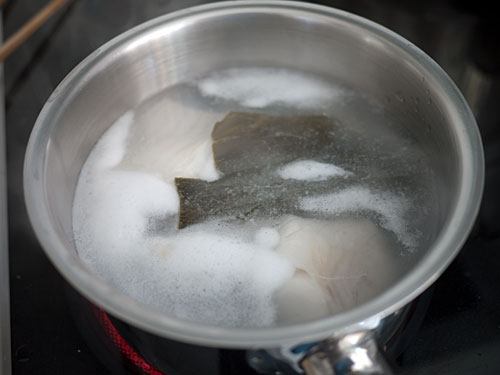
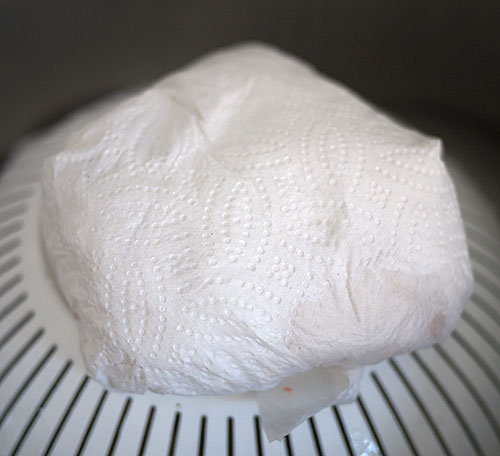


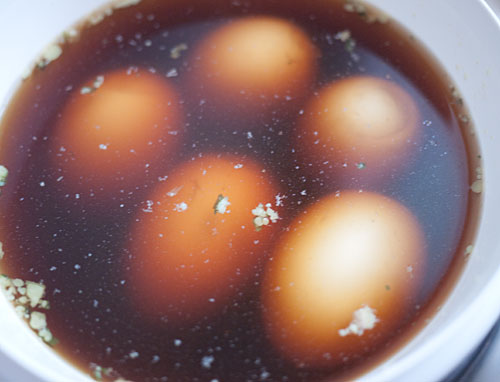
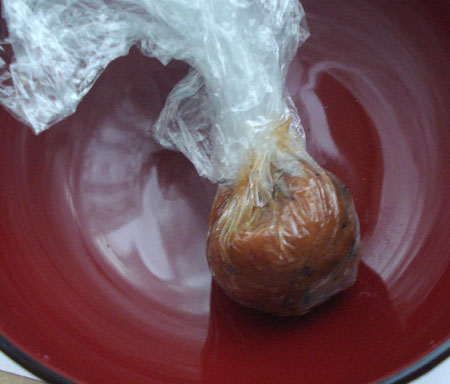
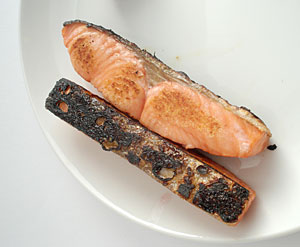 Salted salmon is cheap and easily available in Japan, but not so outside of Japan. So I've been making it myself for some time now, and it's quite easy. All you need is a typical refrigerator that has low humidity. (If yours doesn't have excess condensation in it, and old leafy vegetables get dessicated in the corner of your vegetable bin, then it's ideal.)
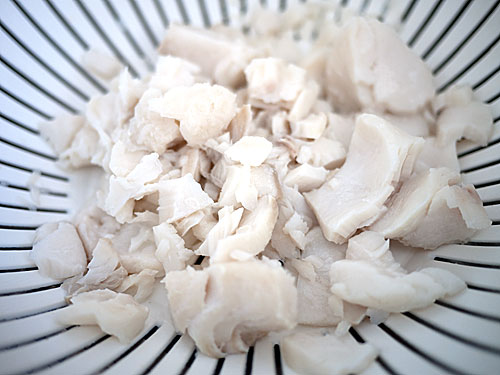
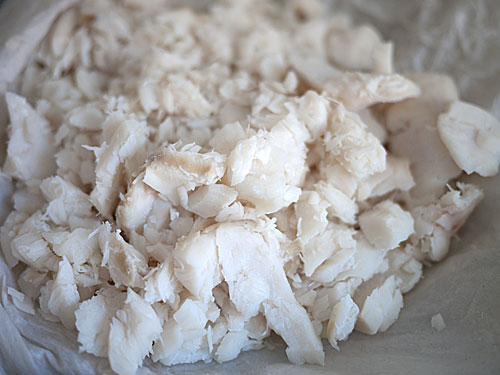
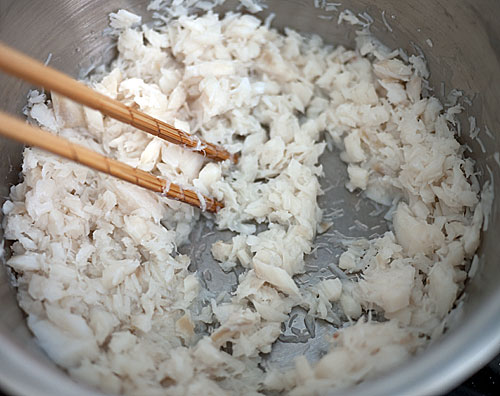
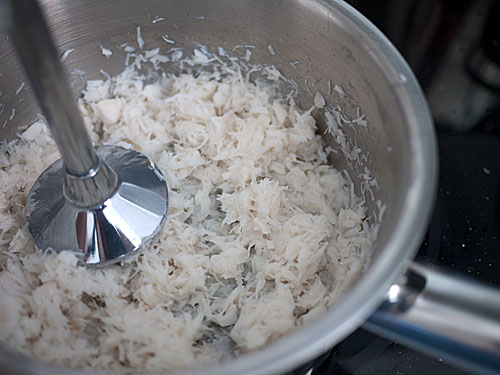
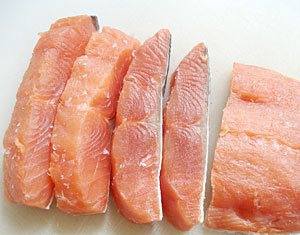 After 24 hours or more, unwrap the fish from the paper towels, which should have absorbed the excess moisture. The fish will be a deeper pink/red. Pat off any surface moisture, and cut it into pieces. Wrap each piece well in plastic and store in the freezer. It will keep nicely for a couple of months.


 I'm not much of a breakfast person, so I prefer something light. This has been my favorite breakfast lately.