
Fun with sweet mochi and fruit "sushi"
To start off the weekend, here is a fun guest post from Jen of Tiny Urban Kitchen, about making sushi that is not exactly what it seems to be!
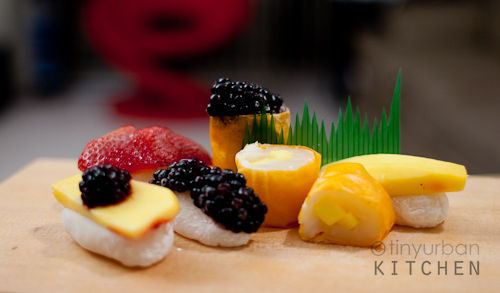
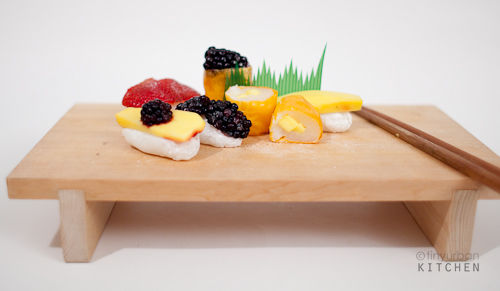
This is not what you might think it is. Yes, it looks like sushi - almost too similar. But guess what? It's mochi! It's mochi with various fruit pieces posing as fish.
Mochi is surprisingly easy to make. You can actually make this dessert with kids, it's so easy and fun. The nigiri are especially easy - just cut up various fruits into squares to put on top. Rolls are a bit trickier, but not impossible. For the rolls, I used soy wrappers (see tutorial below).
Basic Mochi Recipe
[note: Sweet mochi made from mochiko or a combination of mochiko and joushinko (rice flour made from medium grain or regular Japonica rice) and used for sweets, is also called gyuuhi. - maki]
- 3/4 cup / 178ml Mochiko (glutinous rice flour)
- 3.4 cup / 178ml water
- 2 to 4 tablespoons sugar
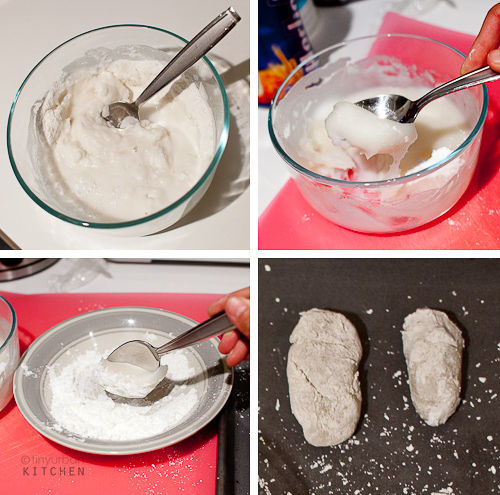
Combine the mochiko flour, water, and sugar in a microwave safe container and stir until completely incorporated. I find that 2 tablespoon makes a pretty light mochi, which might be preferable if you plan on adding a sweet filling. If you plan on eating it plain, I would add more sugar.
Cover with plastic wrap tightly and microwave for 2-3 minutes. This depends on your microwave strength. Check after 2 minutes to see if it's done. The previously liquid mixture should be solid now. Typically the plastic wrap will expand while heating (creating a bubble on top of the container) and then it will shrink and become concave once you take it out (due to the rapid cooling air inside the container).
I like to use a glass Pyrex container with plastic wrap for microwaving because I know it will retain the moisture inside. I once tried making it with a plastic lid and I think too much moisture was released, resulting in a hard, rubbery mochi.

Nigiri
Once you have microwaved the mochi, scoop out a small lump with a spoon (see bottom left picture above) and dump it into a bowl of corn starch. Use your hands to lightly shape the piece of mochi so it looks like an oval, similar the rice shape of a nigiri sushi.
Cut pieces of fruit into rectangles about the size of the fish on top of the sushi. You can use any fruit you want. I used mango (for tamago/egg), strawberry (for maguro/tuna), and blackberries (for some sort of caviar I guess!).You could also use cantaloupe for salmon, honeydew for cucumber, and watermelon for tuna. Be creative!
Lay the fruit on top of the mochi, and you are done! If you want, you can lightly sprinkle some sugar on top, but this is totally optional.
For fun, you can make marzipan wasabi, like I did in this post.
Enjoy and serve!

Maki Rolls
Maki rolls are just a bit trickier. It helps if you have some experience making normal sushi rolls.
These maki rolls are made with soy wrappers by the company Yamamotoyama. You can either buy a variety pack with various colors (5 sheets), or buy bulk packs (10 sheets of a single color). All soy wrappers are naturally colored, spinach for green and paprika for orange one (and I think beets for pink, but I did not buy the pink one). The small amounts of coloring agents do not affect the flavor. I bought my soy wrappers online at asianfoodgrocer.com which actually has a pretty good price for the bulk packs (unfortunately they do not carry the variety pack, but you can get that on Amazon.com). [Note: In the UK/Europe you can order these from Japan Centre. As far as I know though, Yamamotoyama doesn't sell these in Japan. - maki]
The soy wrappers have a very mild hint of soy flavor. I would recommend using a strongly flavored filling to mask any hint of the soy aroma if it bothers you. The wrappers do lose this aroma over time. I noticed that I did not smell the soy flavor in the rolls the next day.
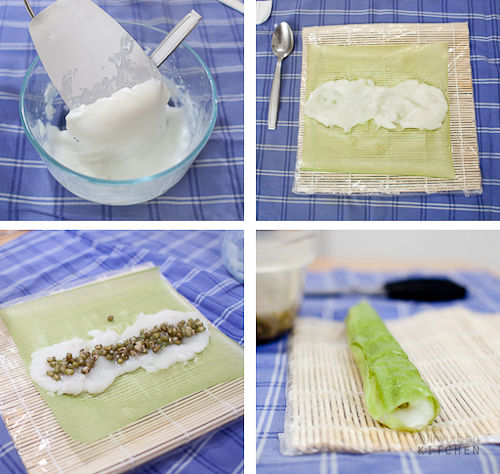 Make mochi according to the microwave recipe above. Now, instead of taking out small chunks like we did for the nigiri, try to lift the entire sheet with a spatula and gently lay it down on a soy wrapper. I divided the sheet I had made into two pieces so I could lay it across the soy wrapper.
Fill with your filling of choice. In this case, I used some leftover sweetened mung beans from mung bean soup I had made.
You can also use fruit (see pictures below using mango), red bean paste, black sesame paste, or crushed peanuts. Roll as you would normal sushi. With the soy wrappers, you need to use a bit of water to seal the roll.
Make mochi according to the microwave recipe above. Now, instead of taking out small chunks like we did for the nigiri, try to lift the entire sheet with a spatula and gently lay it down on a soy wrapper. I divided the sheet I had made into two pieces so I could lay it across the soy wrapper.
Fill with your filling of choice. In this case, I used some leftover sweetened mung beans from mung bean soup I had made.
You can also use fruit (see pictures below using mango), red bean paste, black sesame paste, or crushed peanuts. Roll as you would normal sushi. With the soy wrappers, you need to use a bit of water to seal the roll.
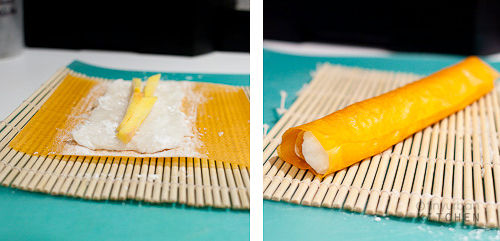 Slice with a wet knife and serve! I used the end pieces to make the stand up maki pieces with the blackberry on top.
 These taste the best when they are freshly made. I tried refrigerating them, but they become a bit harder and lose that nice, chewy texture.
Enjoy!
These taste the best when they are freshly made. I tried refrigerating them, but they become a bit harder and lose that nice, chewy texture.
Enjoy!
About the author
Jen, the author of Tiny Urban Kitchen, lives in a tiny urban condo in Cambridge, Massachusetts, right across the river from Boston. A chemist by training, Jen applies her love of experimentation to the kitchen, which she details in her blog. Jen also loves photography, traveling, and eating out. As a result, Jen also writes reviews on restaurants, mostly in the Boston area but also around the world, complete with plenty of colorful photographs!
If you enjoyed this article, please consider supporting this site by becoming my patron via Patreon.