
Bento 101 (Getting into the Bento Making Habit) Part 3: Let's pack a bento
Welcome to Lesson 3, which is actually the fourth lesson (I know, a bit confusing) of Bento 101: Getting Into the Bento Making Habit. The assignment this week will be to actually pack at least one bento for lunch and bring it with you to work or school, or even to the park.
In the last lesson we covered the subject of the right kind of bento box or container for your eating style. Hopefully you've been able to get a box that suits your needs. If not, I'd like you just pick a suitable container with a tight fitting container.
The tl;dr version: Your assignment for the week
The most important part of this week's lesson is to pack a real bento for lunch at least once during the upcoming week. Make a little extra of whatever you're having for dinner, and set it aside to pack for lunch the next day.
So how do you make this bento-packing business as painless and fast as possible? Here are a few tips:
Planning ahead
1. Planning a day ahead (dinner into lunch)
I've already talked about setting aside some of your dinner for packing the next day. This is one of the easiest ways of planning ahead, and for your first bento efforts I would like you to concentrate on doing that. Note whether the foods you thought would work the day after cooking actually do hold up or not. You may want to adjust your list of packable foods accordingly for the future.
2. Having your gear in place
Quite a few people get stuck on the question of what to pack their lunch in and so on. We've already covered this question in a lot of detail, so you should be all set and ready to go.
3. Advanced planning: the weekly planners
but you can do a bit more planning too. Many people find the simple Weekly Planner form or the slightly more complex Weekly Menu Planner forms very handy for not only planning what to pack for lunch, but for mapping out the meals for the upcoming week, figuring out what leftovers need to be used up, and so on.
A bit about nutrition
I don't want to dwell too much on the nutrition issue at this early stage - the most important thing right now is to get into the flow of packing your lunch. But if you want your bento to be healthy as well as tasty and economical, try to include at least one item each of the important macro-nutrient food groups: protein, carb, vegetable, plus fruit. If you need to fill some space in your box, fill it with more vegetables rather than the other foods - especially if you're trying to cut calories.
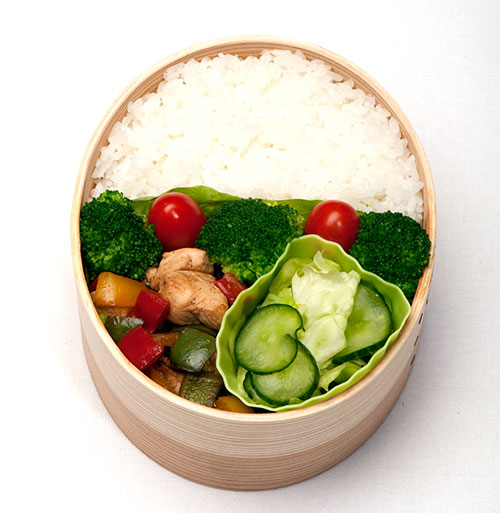
Tip: Cherry tomatoes and steamed or broiled broccoli are your best bento friends
I use both cherry tomatoes and broccoli florets a lot in my bentos. They're both pretty inexpensive year-round, very low in calories yet still very nutritious (especially broccoli), compact and very colorful. They are perfect for filling in any gaps in your bento, regardless of the cuisine.
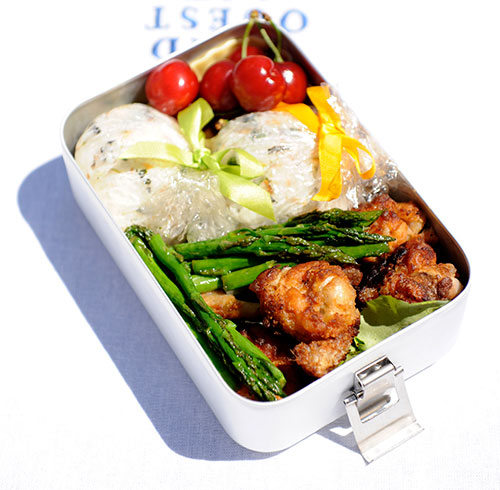
This is a prototype of the bento that was on the cover of the Just Bento Cookbook. (We ended up using another bento box.) Basically I used a row of cherry tomatoes and broccoli to fill the gap between the rice and the rest of the food.
Packing your box
If there's one rule that you must follow for packing cooked foods, it's this: Make sure that everything has cooled down to room temperature at least before putting the lid on. If you put a tight fitting lid on still-warm food, condensation will form under the lid and make your food unpleasantly soggy. Extra moisture also means that unpleasant microbes are much more likely to flourish. This is especially important in warmer weather, but since most of our indoor environments are well heated these days, it's just as important for colder times of the year too.
When to pack your bento: In the morning or the night before?
The standard advice given for packing bentos in Japan is to pack them in the morning. I remember my mother, who had a full time job for most of the time I needed bentos for school (in middle school and high school), waking up at 5:30 or 6 to pack bentos for me and and my sister, make breakfast for all of us, get ready for work then drop off my youngest sister at nursery school before taking the train to her office. Bentos do taste better when they're made in the morning - if you have the time and energy to do so.
But most people don't have either, so the logical thing is to pack it in the evening. If you do make your bento in the evening, just make sure to cool it down completely before putting in the refrigerator - see above about the importance of letting your food cool and avoiding condensation. You may want to open up your box and inspect the inside of the lid anyway; if you see moisture there, wipe it off before re-sealing your box.
The part of a bento that can go 'off' the fastest when packed ahead are the grains - rice, quinoa, or whatever else you're using. They can become unpleasantly hard and dried out in the cold of the refrigerator. One way to have the ease of a packed-the-night-before lunch with good tasting rice or other grains is to pack up everything but the grains in the box, then to pack the grains in the morning.
(Incidentally, one reason why many people love wooden bento boxes, especially uncoated ones like the gorgeous magewappa made in Akita prefecture by Shibata Yoshinobu Shoten, is that the wood absorbs excess moisture and allows the food to 'breathe', which actually keeps it fresher and better tasting than food packed in plastic.)
Don't pack your bento further ahead than the night before though, unless the food you're using keeps very well.
Pack tight, unless your food needs space
As we talked about in the previous 2 lessons, in most cases you want to pack your food as tightly as possible so that it doesn't shift around. This actually makes your bento look way more attractive and appetizing at lunch time. You may have already tried packing leftovers and things for lunch - say, some pasta salad or something - and been a bit dismayed at how messy it looks after it's been bouncing around in your backpack.
For lunch jar users (e.g. Mr. Bento)
For lunch jar users who want to pack a hot soup or stew in their thermal jars: make sure to heat the jar up by pouring boiling water into it, then emptying it out, before filling with your piping hot soup or stew. (This is usually included in the instructions that come with the jar.) If you put the food into a cold container it will only be lukewarm at lunchtime. You don't have to heat up the non-thermal side containers of course.
Salad and sandwich lovers
If you want to pack a salad, try packing the vegetables and the dressing separately rather than mixing it all up, to avoid soggy greens.
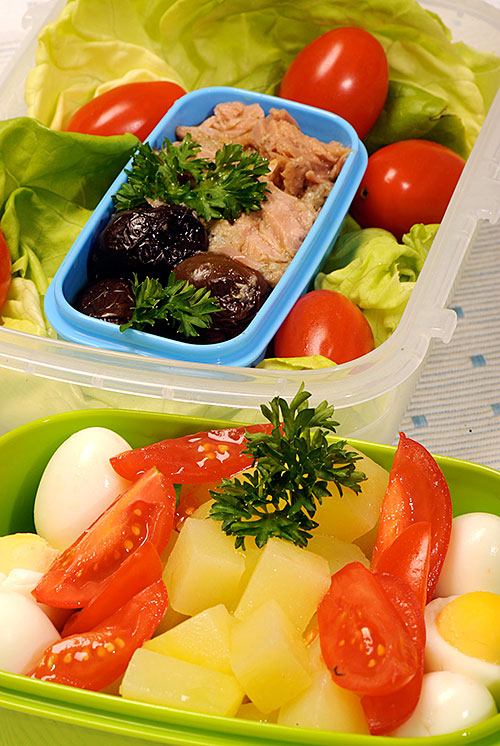
Ths is a prototype version of the 'Deconstructed Salad Niçoise Bento' that appears in the book (you can see the recipe under the listing on the Amazon page.) Each part of the salad is packed separately in little boxes, to be combined at lunchtime.
Sandwich lovers may want to take a look again at the deconstructed sandwich ideas I listed in the previous lesson.
Back to the assignment
To repeat: your assignment (Assignment 4, if you're counting) for this week is to pack a real bento for lunch at least once during the upcoming week. Make a little extra of whatever you're having for dinner, and set it aside to pack for lunch the next day.
If you'd like to share your results, besides posting a photo, I'd like you to reflect on the following questions:
- Did you enjoy your lunch?
- Did you enjoy making your lunch?
- Were there any issues with toting your lunch to work/school? Any issues at the office?
- Is this something you see yourself doing regularly?
I look forward to seeing your results!
If you enjoyed this article, please consider supporting this site by becoming my patron via Patreon.