
Bento no. 21: Chicken teriyaki bento
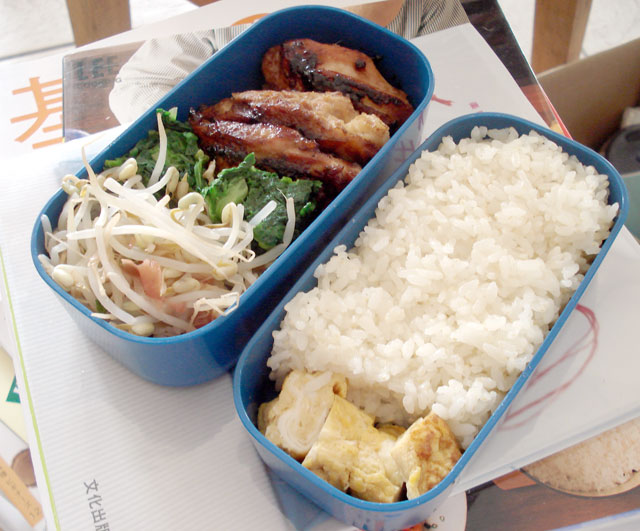
Bento contents:
- Bite size chicken kijiyaki (or teriyaki) made with 90g of thigh meat with the skin (210 cal)
- Blanched bean sprouts with umeboshi (5 cal)
- Blanched spinach (10 cal)
- Haiga-mai, or germ rice 150g or about 1 cup (170 cal)
- 1/2 of a tamagoyaki made from 1 egg (50 cal)
Total calories (approx): 445 (how calories are calculated)
Time needed: 15 minutes in the morning, 20 the night before
Type: Japanese
This is the 'skinny bento' featured in Skinny Bento vs. Not So Skinny Bento.
I made everything in advance the night before except for the tamagoyaki, but I could have made that in advance too. This can also be made in the morning in about half an hour, except for the task of marinating the chicken teriyaki - if you have to do that too, add another 10 minutes or so. (I'd cut up and marinate the chicken, go and shower and stuff, then return to finish the bento.) All in all though, I think this bento is more efficiently assembled by doing almost everything the night before, as I show here.
I've already given the recipes for bite size chicken teriyaki and tamagoyaki, so here I'll note down the recipe that is barely a recipe for the bean sprouts with umeboshi (moyashi no ume ae). This is a refreshingly crunchy and very low-calorie sort of side salad, which I like to serve with a meat dishes.
Recipe: Bean sprouts with umeboshi
- 2 large handfuls (about 2 cups) fresh mung bean sprouts
- 1 large or 2 small umeboshi (pickled plums)
- The juice the umeboshi is stored in, or some ume vinegar (ume-su)
If you want to be very neat and professional, top and tail the bean sprouts. I usually don't bother...though for company, I might take off the stringy long root.
De-stone the umeboshi, and chop or smoosh up the flesh to a paste. Add a few drops of the umeboshi juice or ume vinegar to loosen up the paste a bit.
Blanch the bean sprouts in boiling water for about a minute, then drain and rinse under cold water to cool. (The two large handfuls will shrink down quite a bit, to about 1 cup.) Drain well, and mix with the umeboshi paste.
This does not freeze successfully.
Blanching baby spinach
I like to use blanched spinach a lot in bentos. In Japanese cooking, spinach is rarely eaten raw; its most often blanched, then various flavors or sauces are added to it. In Japan full stalks of spinach (with the roots attached in many cases) are common, but here it's a lot easier to buy baby spinach. Baby spinach blanches in seconds - boil any longer and you get green mush.
When I buy a big bag of 'pre-washed' baby spinach leaves, I wash it first just in case. (It's not gritty usually, but you never know...I once found a tiny snail in a 'pre-washed' bag! At least I guess it was organic...) Then I toss it in a big pot of boiling water. As soon as all the leaves are in the water, I immediately drain the spinach into a colander, and then refresh it by dunking it into cold water.
I then squeeze it out with my hands into a small log (that big bag will shrink to a pretty small log). I cut the squeezed out log into pieces that are about the height of the bento boxes I use. The little cut up logs can be frozen, and taken out as needed.
Haiga-mai, germ rice
Haiga-mai is white rice with the rice germ intact. It isn't as fibrous as brown rice, but has more nutrition than plain white. You can find it more often these days at Japanese grocery stores. (See Looking at rice.)
Steps to make this bento
The night before:
- Bone the chicken if you need to. Cut into bite-size pieces, and dunk into marinade. Cover and put into refrigerator. Cook the chicken. (Follow the bite size chicken teriyaki instructions.)
- Boil up a kettle full of water.
- Wash the bean sprouts and spinach.
- Use about half the boiling hot water in the kettle to blanch the bean sprouts. Drain, refresh with cold water, drain, and mix with the umeboshi.
- Use the other half of the hot water to blanch the spinach. Drain, refresh, squeeze out, and cut.
- Store everything in the fridge.
- Wash the rice and set your cooker timer.
In the morning:
- Pack the cooked rice in the bento box. Leave to cool.
- Mix up the tamagoyaki, reducing the proportions for 1 egg. (You can make a 2 or 3-egg tamagoyaki, and either put more in your bento box or save the extra for the next day.)
- Cook the tamagoyaki. Leave to cool a bit. (If you want a neatly shaped tamagoyaki, the sushi mat may be too big for a 1-egg version. Use a couple of sheets of paper towels instead - the paper towel will protect your hands from the heat better than using plastic film.)
- To be ultra-safe, heat the chicken through in a dry non-stick frying pan, then let cool. (You can skip this if you are confident your chicken is fine.)
- Pack the chicken and vegetables into the bento.
- Cut up and pack the tamagoyaki.
Timeline

If you enjoyed this article, please consider supporting this site by becoming my patron via Patreon.