Making onigiri with a plastic bag
Onigiri (rice balls) are a staple bento ingredient, and can be made in all kinds of shapes with all kinds of fillings. As I've covered this past week or so, you can even get bento boxes designed specifically for carrying onigiri. Previously on Just Bento and Just Hungry, I've covered how to make them the traditional way by hand, and using plastic wrap and a cup.
Reader Samantha (aka Koorogi) sent in this great way to make onigiri that cleverly uses the corner of a plastic bag, to make these perfectly triangular or cone-shaped rice balls, as well as other shapes. It's definitely a method worth adding to your repertoire. (All the photos in this entry are taken by Samantha.)

The basic tools she uses are: a plastic bag, a bowl or container containing salted water, and a rice paddle. She recommends starting the process by cooking the rice first, cooking the filling if you are using one, and getting everything together while the rice finishes cooking. (She uses Calrose brand rice: See this all-encompassing article about onigiri for what kind of rice to use that sticks well together!)
Here's how she forms a basic unfilled onigiri, in her own words:

- "Take a small bowl and put some water and salt in it, stir until the salt has dissolved."
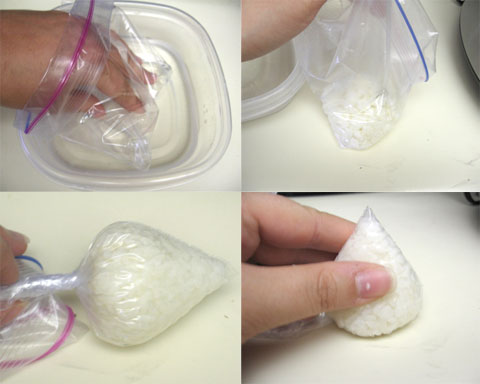
- "Take a Ziplock bag and dip the inside into the salted water, then turn it back the right way (top left photo). Make sure that there's not a pool of water inside, that it's just sprinkled lightly."
- "Take your rice from the steamer while it's still hot (I would recommend that you get an idea of your portions by using your rice paddle to section your portions out after you've fluffed it, this way you don't have to worry about measuring things in the middle of making your onigiri or running out of one of the components). "
- "Place the total desired amount that you're going to use into the bag (top right photo). "
- "Push it all towards one of the bottom corners (bottom left photo)."
- " Push all the air out and twist the top while shaping it (bottom right photo)."
Samantha says that you can form the onigiri into other shapes while it's still in the bag - her kids like kitty shaped onigiri!
Making filled onigiri is just as easy, with a little adjustment. At step 4, put in 2/3rds of the total amount of rice for the onigiri in the bag. Then:

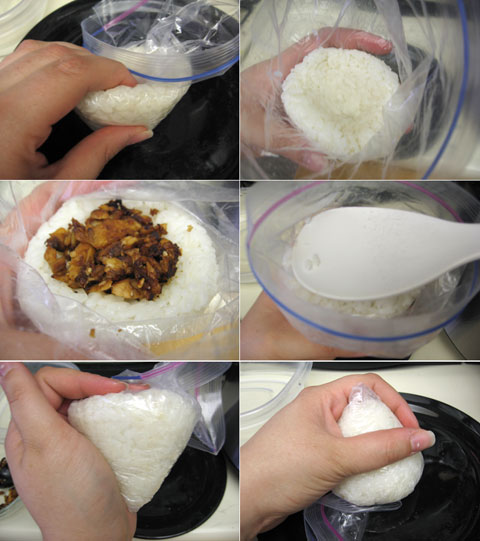
- "Press and mold using your fingers a cup out of the rice (top 2 photos above). Then fill this with your desired amount of filling (again, I would recommend that your section this out like you did with the rice). Press it gently down so that it's level with the top of the “rice cup” (middle left photo)."
- "Next, take the last bit of your rice portion (should be about 1/3 of the original amount) and using your rice paddle, place it on top of the “rice cup” and pat it down with the paddle (middle right photo). If you're having trouble getting your ingredients into the bag, just fold the outside Ziplock part down and it automatically creates a gaped opening. Using your fingers gently pinch the edges so that the “rice lid” connects with the “rice cup”."
- "Continue molding it until you're happy with the shape and sure that the “lid” and “cup” are attached (otherwise it will just fall apart and your fillings will be everywhere). Push all the air out and twist the top while shaping it (bottom left photo). Turn it over and press it gently, but firmly to the counter (or plate) to make the bottom flat (bottom right), then untwist the bag and set it onto the plate."
Once the onigiri are formed, you can add nori seaweed, sesame seeds, more salt if needed, and so on. She says that using this method, it only takes about "20-25 seconds to prepare an individual non filled onigiri and about 35-40 seconds per filled onigiri" - and it's only her second try!
Tilapia filling
For the tasting looking filling the onigiri shown here, Samantha used frozen tilapia that she gets in big bags from Sam's Club (she says Albertson's carries them as well). Here's her recipe:
- 1 piece of Tilapia
- Salt (preferably freshly ground sea salt)
- Soy Sauce
- Sesame Seeds
"To prepare the Tilapia filling, place a single piece of frozen Tilapia (one individual pack, plastic removed) in a non stick skillet. No oil or anything should be needed. You can spray the skillet with a light spray of Pam if you would like. Once it starts turning white (instead of translucent) flip it over. Once it starts to brown, salt. I use freshly ground sea salt that you can pick up at most stores, but you can use table salt as well. Break it up gently as you continue flipping it. It should begin to start flaking. Once it's completely broken up and starting to get crunchy, sprinkle some sesame seeds and then pour a little bit of soy sauce on it (to taste), cook it a few minutes longer until the fish is not so wet because of the soy sauce. Once your filling is done, go ahead and set it aside."
Samantha says: "Even my husband (who can't stand white rice) fell in love with them and is now asking me to start making him full on bentos as long as they include onigiri."
A big thanks to Samantha for sharing her great method!
If you enjoyed this article, please consider supporting this site by becoming my patron via Patreon.
